Showing posts with label Stampin' Up!. Show all posts

Sunday, February 1, 2015

Altered Playing Card Week 18

Flowers is this weeks theme at the Altered Playing Card Challenge, week 18 :
For this APC I smushed my card through vibrant red, green and blue acrylic, then stamped the flowers from a Paper Artsy flower set, fussy cut them and added the sentiment.
Firstly, can you believe I used the same paint as for the APC above ? The addition of white made all the different in muting the tones. For this APC I used a flower from a retired Stampin' Up! set. When I had smushed my card through the paint for the background I smushed another pice through, then stamped the flowers in black and fussy cut them. I love that the colors all co-ordinate that bit better :)
 Thanks for stopping by x


Monday, December 22, 2014

Altered Playing Card - Week 13

This weeks challenge was all about the bees. Here are my APC's :
The first APC is using the wonderful and very realistic bee from the set by Lost Coast Designs, called More Bugz. Look how realistic it is :
The bee was stamped onto white cardstock in black ink, colored with mustard colored india ink and the wings are painted with my wink of stella pen. I then fussy cut the bee.

Here is the whole APC. The background was done with a thin layer of gesso and I used a honeycomb stencil. I colored the whole background in wild honey distress ink. The flowers were stamped in brown and green and embossed in clear embossing powder, top right corner too. Then when it was dry I removed the ink with a baby wipe. I sprinkled a little gold embossing powder behind the bee and heat set it, you can probably see that clearer in the pic above.  I then added the sponged hexagons and strip of patterned paper across the bottom. The whole thing was lightly edged in a burgundy ink.
The sentiment was really quite meaningful, "Long Live the Queen". I get so upset when I read about the chemicals used in farming that are killing the bees, its utter stupidity in my opinion and we should all be concerned about that ..... I hope we can protect these beautiful and very important little insects and colonies.

The second APC is indicative of my life with three young ones at home. I am always busy as a bee ....
 The background was painted with yellow acrylic paint, sponged some orange and then I added some gold - that signifies the honey :) I stamped in black ink some criss-cross and honey comb shapes. I used a Stampin' Up! embosing folder to make the honey comb, and the bees were stamped from a retired Stampin' Up! set called Nature Walk. The bodies were stamped onto white cardstock and colored in. The wings stamped onto vellum and heat embossed. I like to stamp using black versamark then use Wow white pearl embossing powder. I love the pearl look of it and you get a little black showing through.

Close up of the APC, showing the shine of the background and the bee's wings :

 Loving this altered APC challenge, I always look forward to the next weeks ideas from Claudine, although mine hardly seen to resemble hers in the end. I love that everyone doing this challenge interprets it differently.


Friday, December 12, 2014

Christmas inspiration

Couple of projects we made at our last card club for 2014 :

This is a simple one layer Christmas card. I love all the detail and work you can add to a card, but often doing this for each Christmas card is just too much work - unless you start making them during springtime for example though - but who does that ? LOL
For this card I die cut a mask (circle and ornament shaped) and then stamped through the diecut. For the example above I used a retired Stampin' Up! wheel - perfect ornament for a Canadian Christmas card I thought, and a vintage stamp. When the ink was dry I applied my versamark through the stencil and then used iridescent ice embossing powder that was heat set. I love the shimmer and the definition it adds to the outline of the ornament : 
This card was inspired by Karen Day, a dt post for the Dynamic Duos blog in 2012. 

For the second project, we made a table decoration using the Bigz petal box die, and old olive cardstock. The tree was stamped in old olive using the ornamental pine stamp set, and punched some holes. The tree was assembled and the embellishments added, branches cut from the Stampin' Up! bird punch. Inside there is a fake candle and the light shines through the holes :) 

Tuesday, November 11, 2014

Card class

Couple of cards we made in class this week.

The first uses Ornamental pine stamp set. This card is a simple one layer card so very easy to reproduce in big quantities. It is cased from the Stampin Up Christmas catalogue. The branch and cone are embossed with white embossing powder. The blue is the gorgeous lost lagoon :
 The second fun card uses the new stamp set Santa Stache. His hat is colored with the new blendabilities, alcohol markers in Cherry Cobbler. His moustache is die cut with the die. Add a sentiment, a bit of embellishment and a quick and easy card. 

Thursday, October 16, 2014

Few fall and Halloween makes

In the technique classes this week, we made this card with fall colors. Would be great for more demure or mature occasions :)  I was inspired by the cover of my favourite craft mag from a few months ago, The Craft Stamper. But I wanted to do the northern lights technique for the background of the sihouette image of the birds on the branches.
Ingredients : Stampin' Up! stamp set : Serene Silhouettes, 2013-2015 in colors.

After this more serious and mature card, we moved to kids Halloween treats using punches and the stamp set called 'Bite Me'. So a treat bag filled with yummy skittles and an embellished tic tac container. I have seen so many of these on pinterest/the www, I dont know who was the initial creator of the tic tac sleeve to give credit, but whoever it was - awesome idea :)


Thursday, September 25, 2014

Stampin' Up! cards ...

Making cards for the technique classes I run. It feels like a long time since I have done this, I guess it was 4 months. Took me a while to get back into the swing of it, but so great to get together and craft with all those super eager crafters again.

Two cards we made, both focussing on emboss resist :

Firstly using the large background stamp, Swallowtail. The butterfly was embossed using clear embossing powder, then various colors sponged over the image. The excess ink wiped away with a kleenex. Its almost like magic how the butterfly appears when the color starts to be added, it suddenly pops :)
 I wanted to do something a bit different so the large butterfly actually flows over to the back of the regular 4.25 x 5.5" card. The sentiment is from a limited edition set called Good Greetings, and we used the word window and modern label punch, with an old olive bow :)
 The second card uses the Pleasant Poppies background stamp, and we embossed in white on crumb cake / kraft cardstock. The poppies are colored using  rich razzleberry Stampin' write marker. The poppies are die cut using the Bigz clear oval accent die, and a separate white piece die cut for the sentiment, which  is from the Blooming with Kindness stamp set.
 Some additional poppies are fussy cut and pop dotted in place. A couple of rhinestones added for bling and watered down white acrylic paint flicked on with a paint brush.
I have 8 people in each of my technique classes, and they all really enjoyed these cards x

I always make little thank you's, this months :

Thursday, June 12, 2014

Animals atc

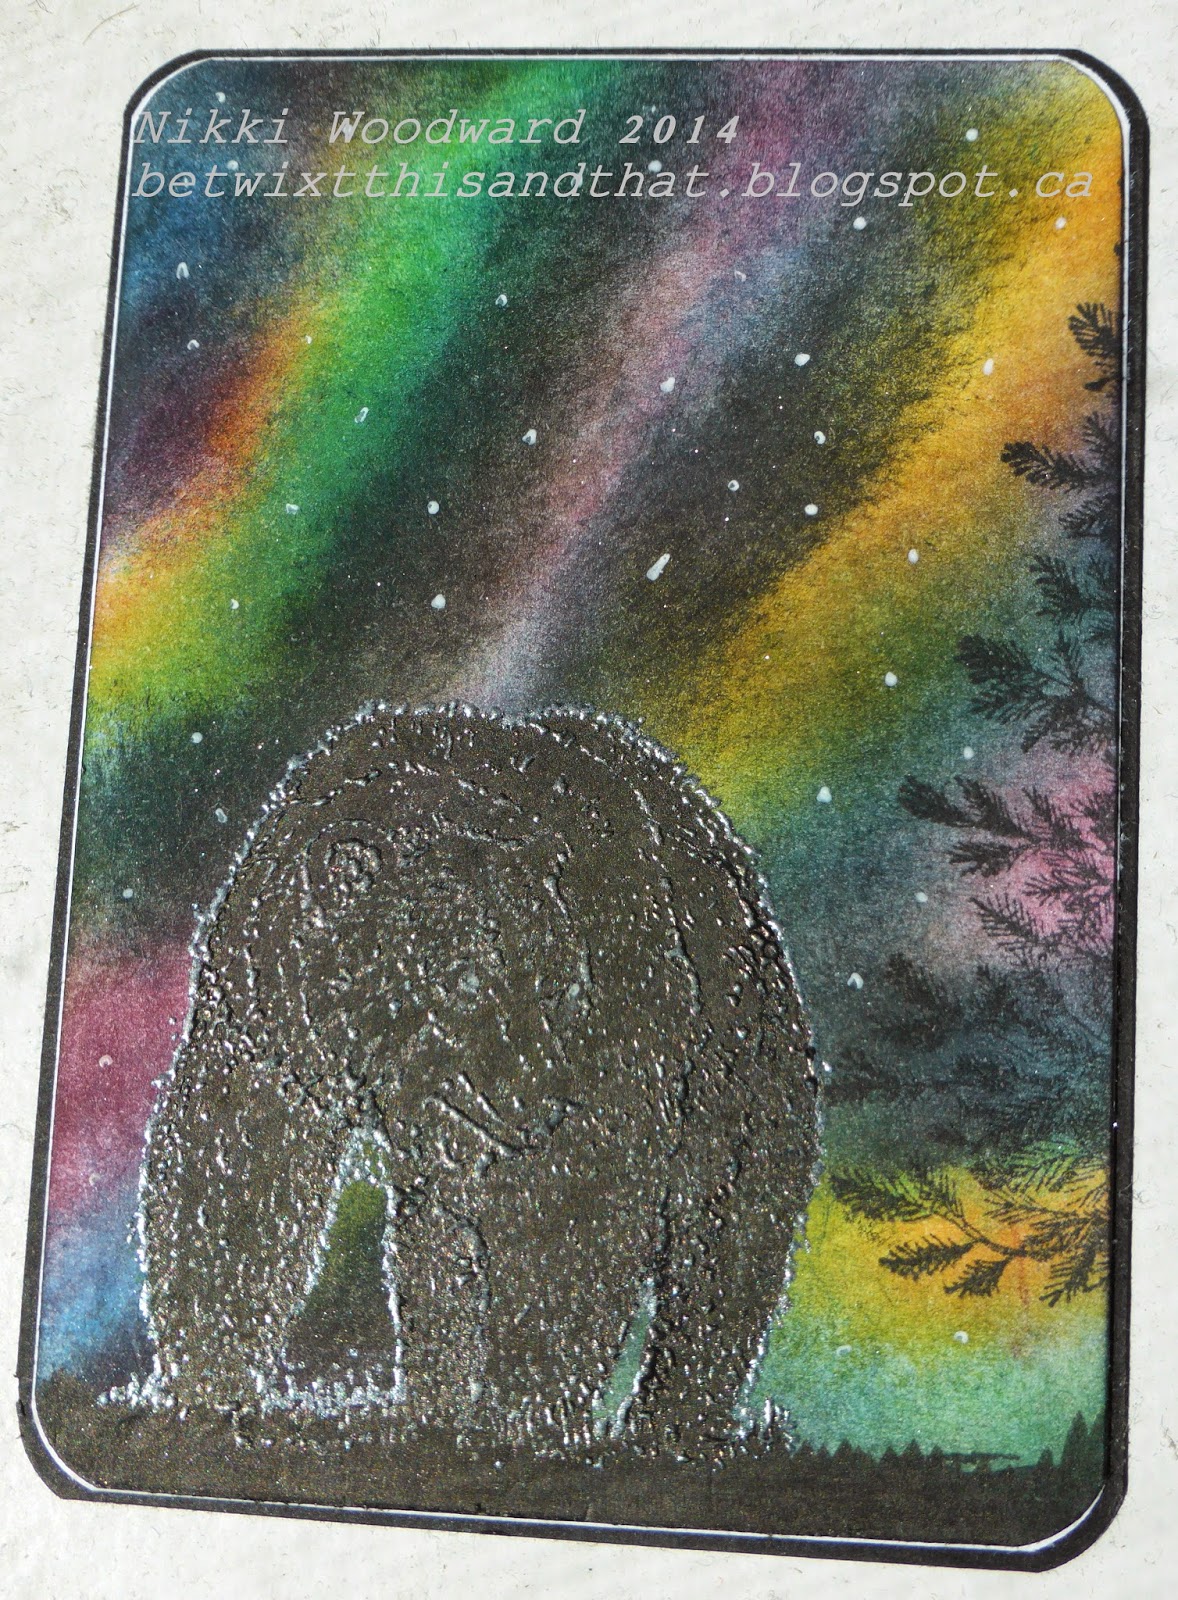
I know, I know ... I'm going a bit overboard with the dancing lights ... this is the last, I promise. LOL. This atc was made for an atc trade with some talented girls in the UK, the title being simply 'animals'. Well, that was the complicated part because I have a whole big box of animal stamps - what to choose ??? I liked the idea of a native animal, a silhouette, coupled with an interesting sky. So tadaar, here is the finished atc :
The bear was stamped in black versamark and embossed with Wow super fine pearl white embossing powder. What that did was left a white/metallic looking sheen on the bears coat - exactly what would be seen in real life as the light reflected from his coat. I colored him with Faber Castell artist pit pens in black.

Thanks for stopping by, please leave a comment.

Monday, April 14, 2014

Grrreat Birthday

Loved this card I whipped up with  a little assistance from the retired SU stamp set 'Under the Stars', washi and copics. It is a simple one layer card, but there's just something I really liked about it. Hope you do too :)

Monday, March 17, 2014

March cards .. some creative fun :)

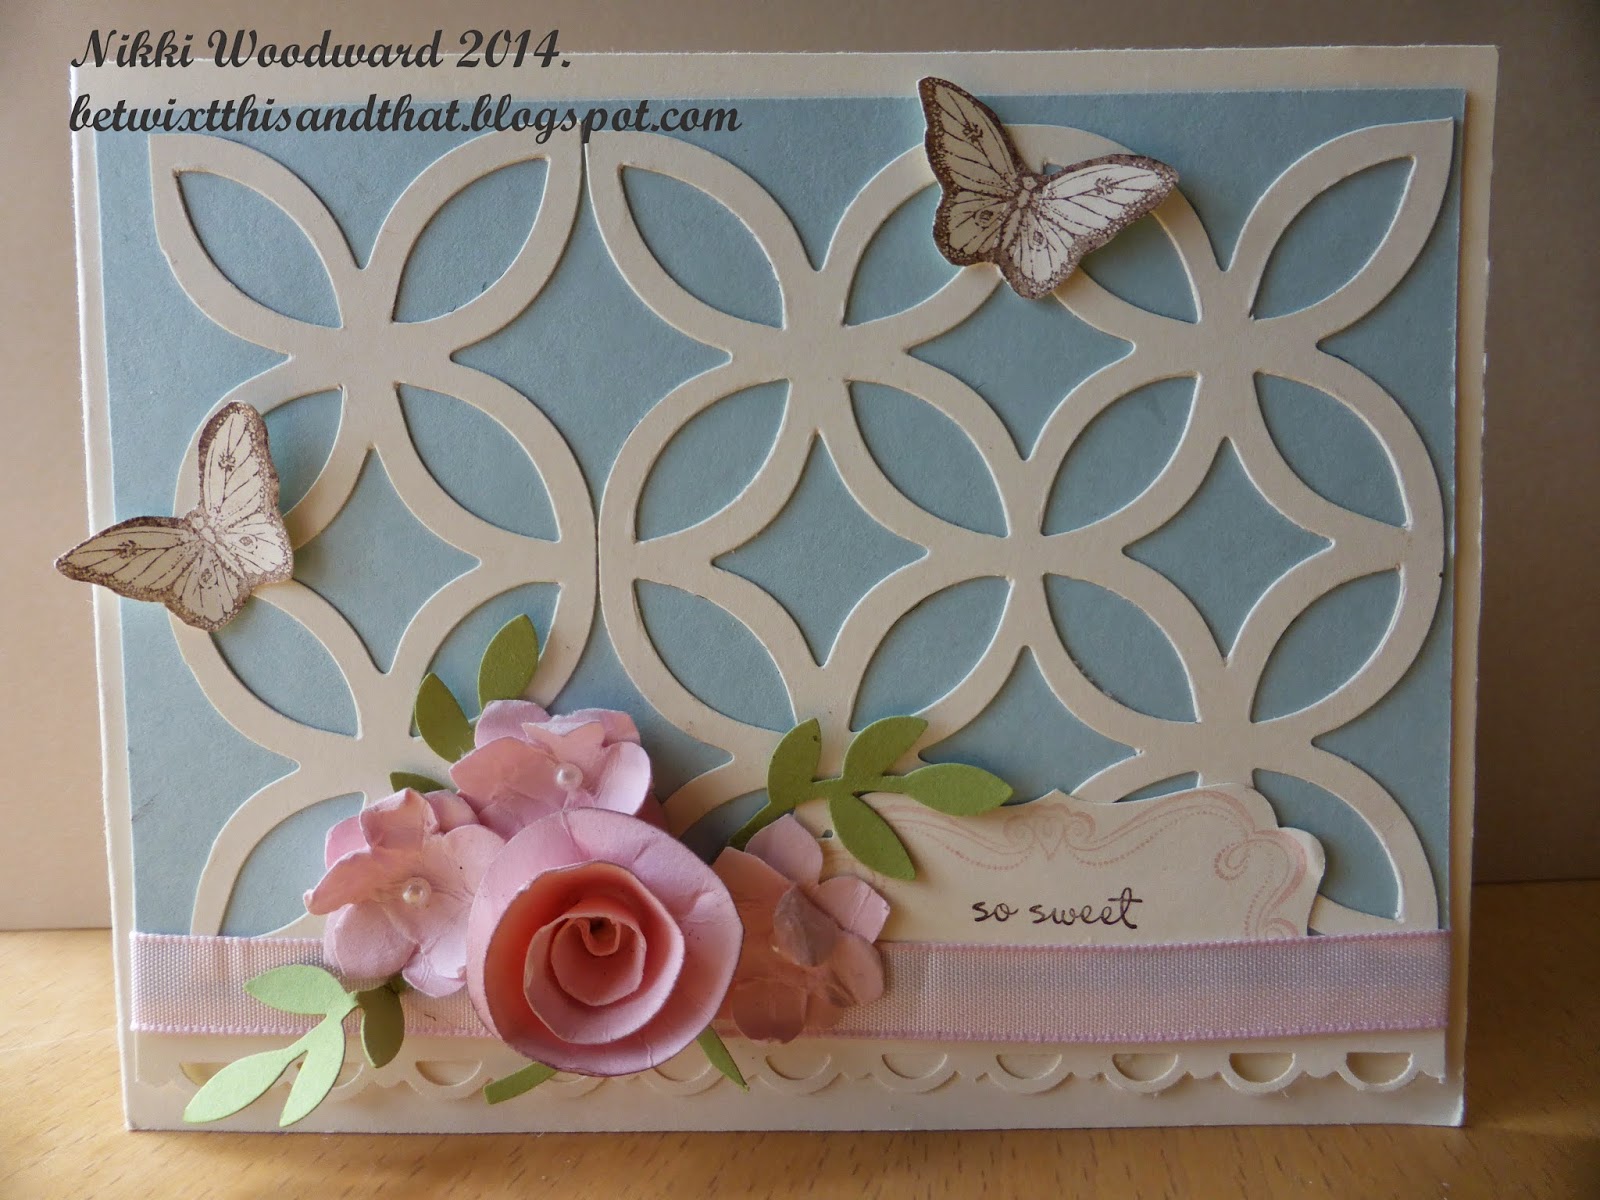
Couple of cards for March, the first being a spring themed flowery card. I used the Stampin' Up! lattice bigz die for the background, I just love that die, its 4x4" so showing here is one and a half of the die cuts, but the other half piece wasn't wasted .. see below what became of that :)

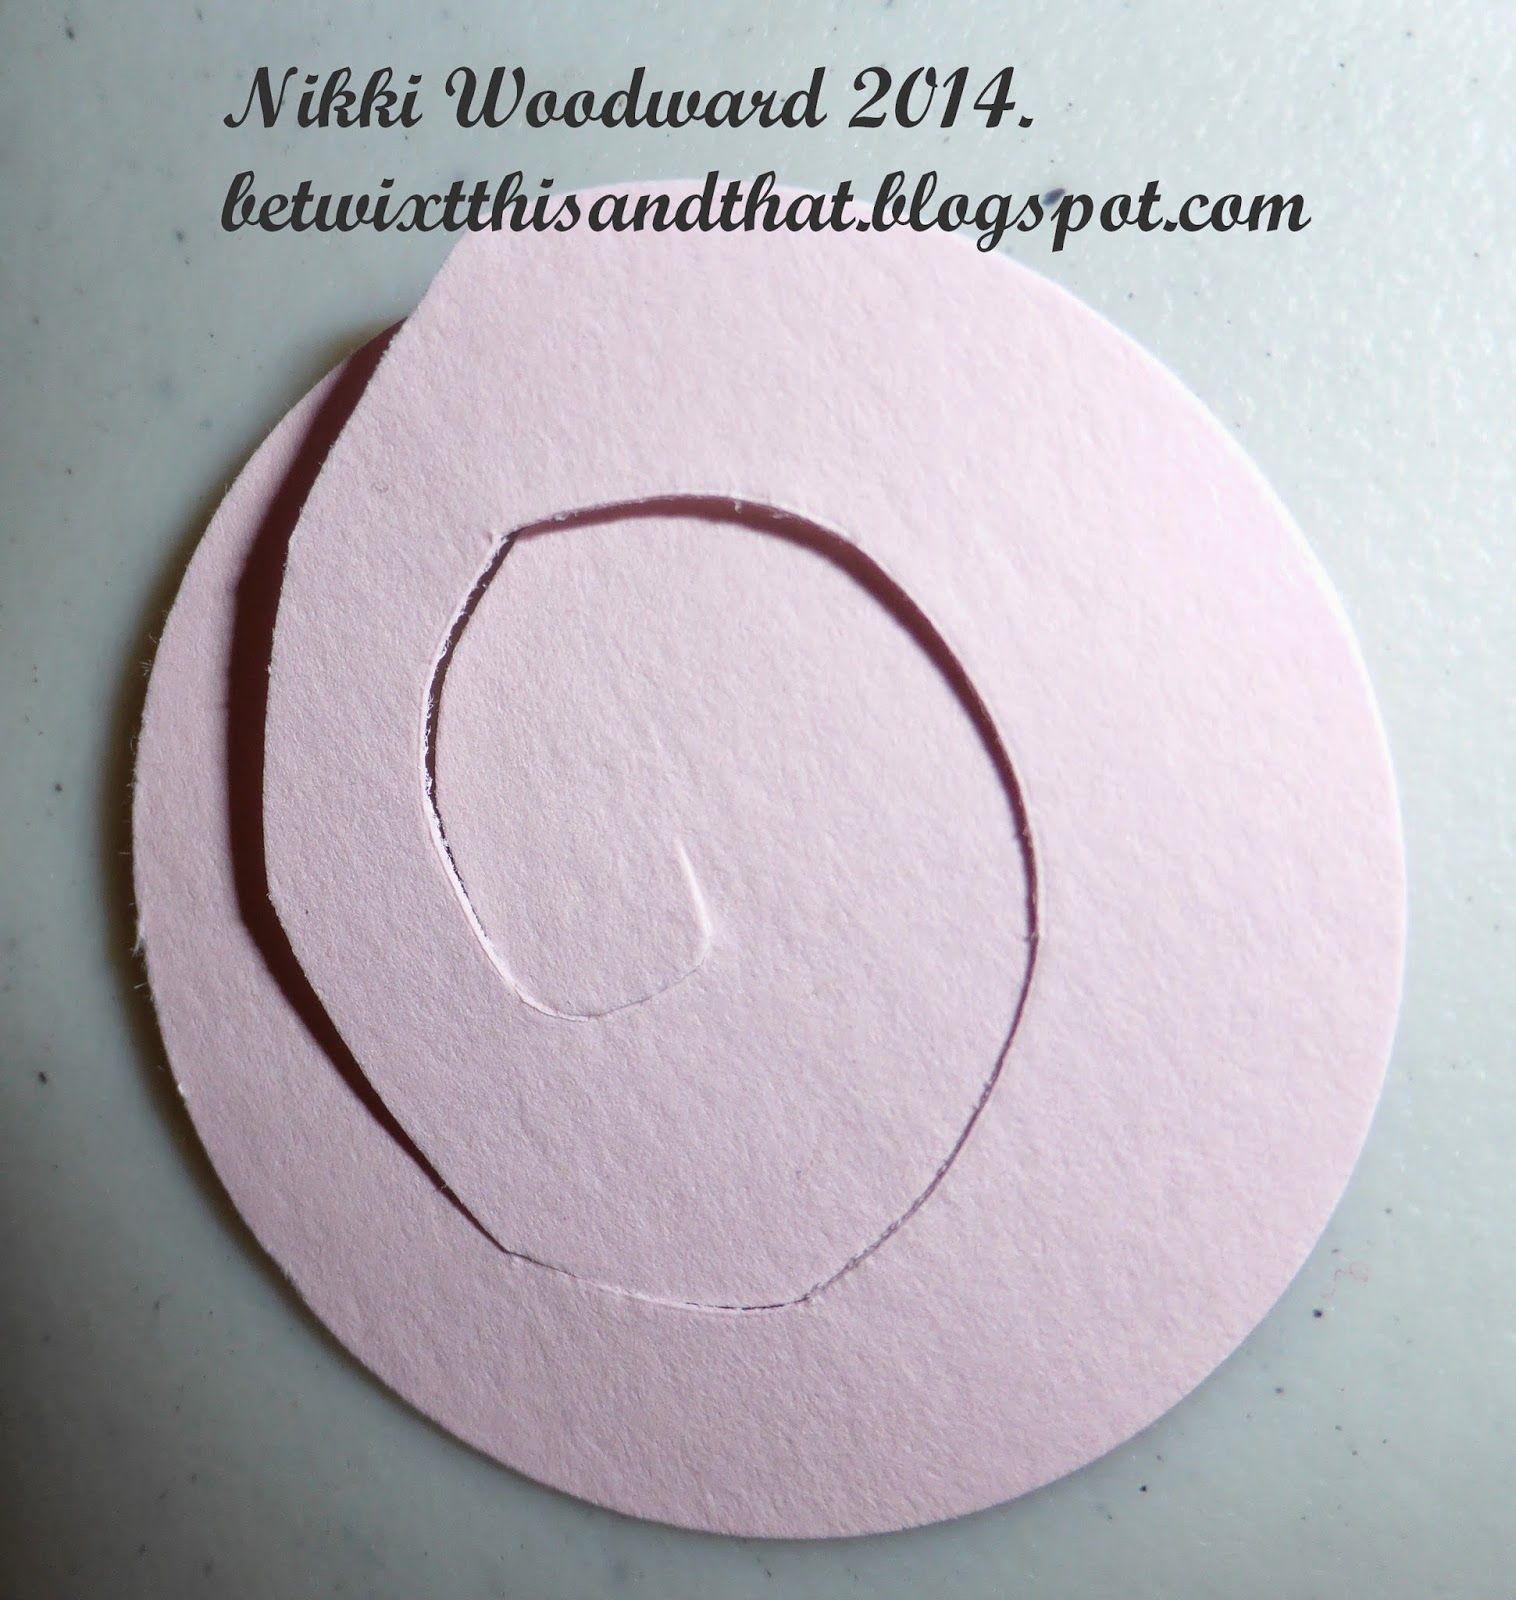
The rolled rose was made by punching a circle from pink cardstock, cutting a spiral and rolling it up. So easy, yet always an original and interesting result. Start from the outside, roll in, keeping what will become the bottom piece flat. The inside (where the spiral cut ends) will form the base of your flower. I use a hot glue gun, put a blob onto a silicon mat and scrape it up with the flower base, then seal it shut.
The little flowers were punched with a flower punched, then rolled and scrunched up to break down the fibres. The top and bottom layer start to separate, then you carefully peal them apart. They give a delicate detail to any flowery project.

The inside of the card was made to be pop up, by using that spare cut off piece from the die cut, mountain and two valley folds. Its always a nice surprise when you open a card to find something fun and interesting inside :)
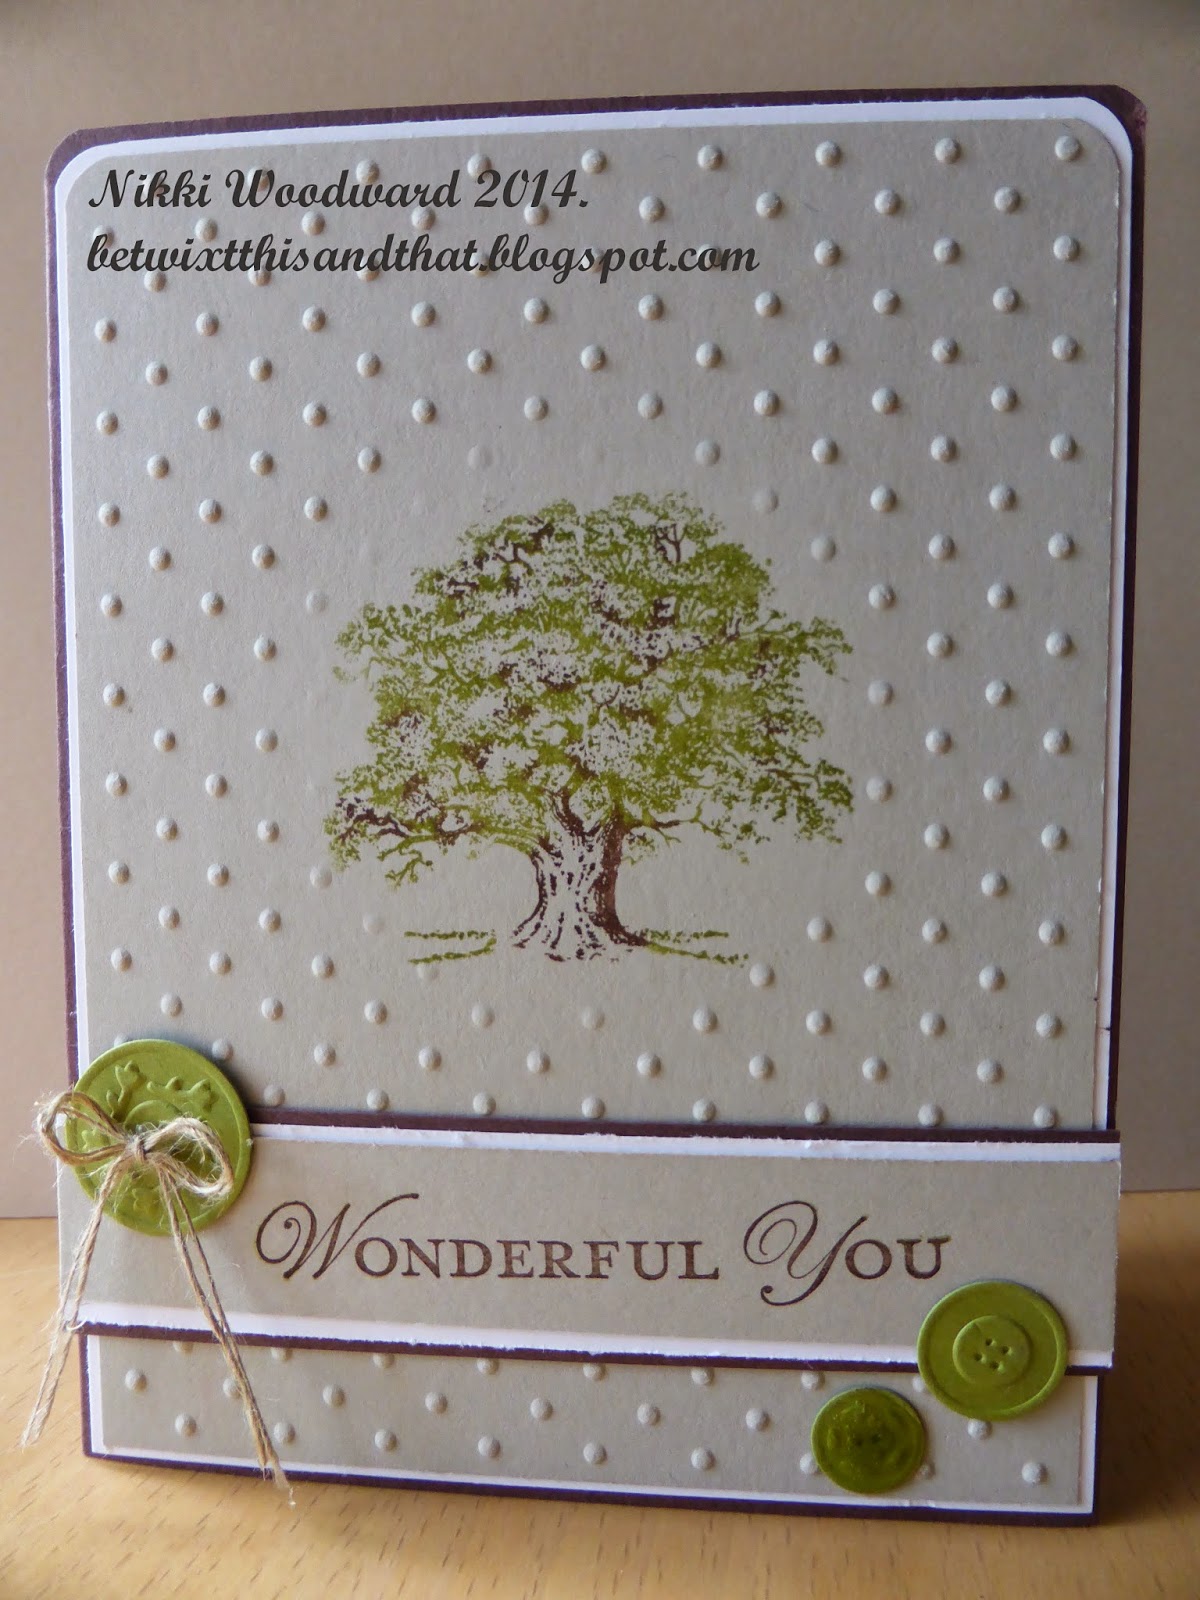
Another project had a more masculine or mature feel, the sahara sand, old olive and chocolate chip worked so well together. The oak tree was colored with markers, the green first, then the brown detail added. Do you notice that the tree is stamped on flat cardstock ? Details of that below ...
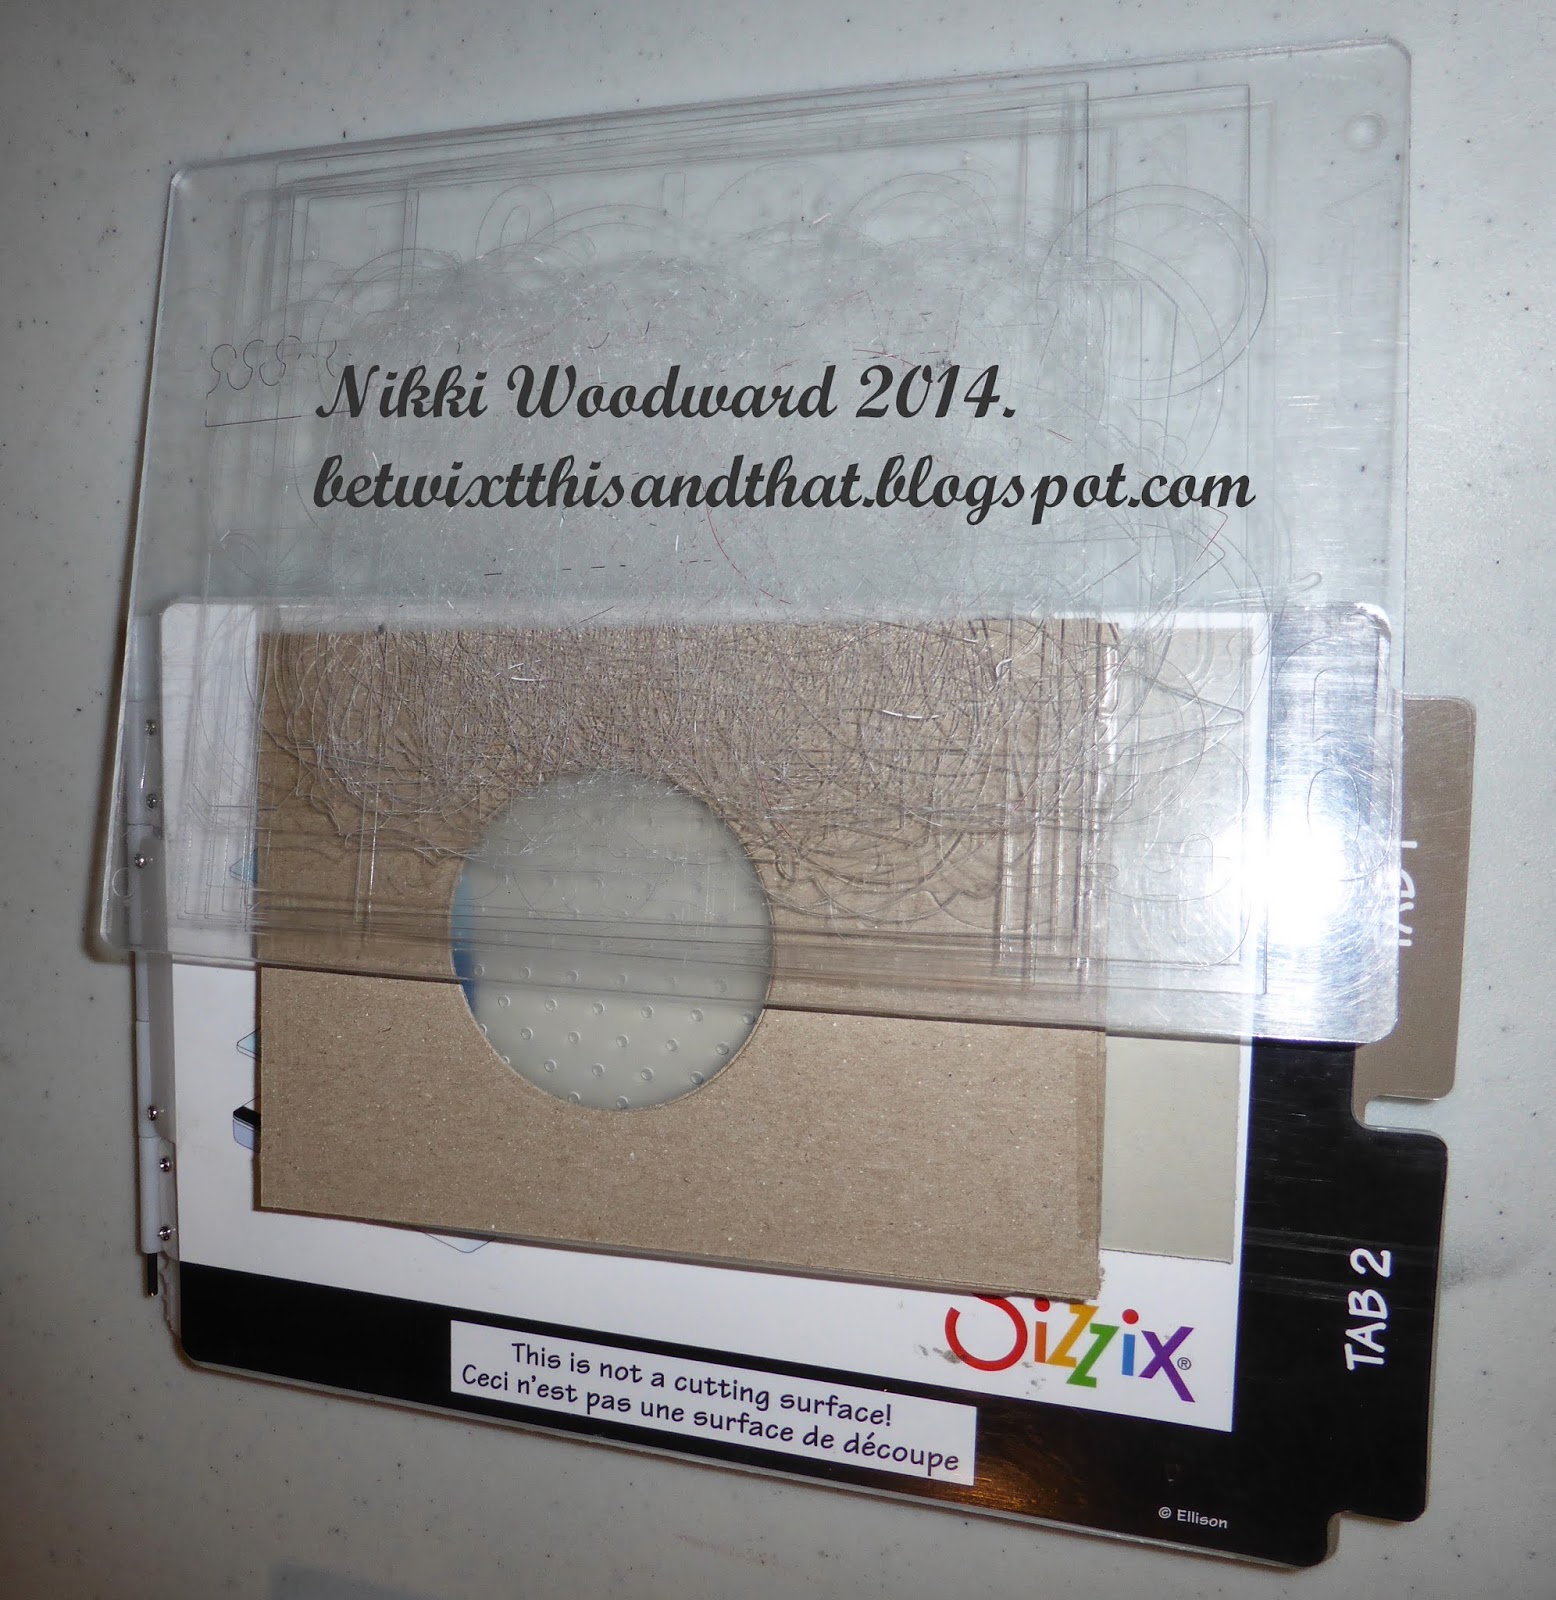
I made my own diffuser, by using two pieces of brown cardstock taped together. A diffuser basically keeps the pressure on or off certain pieces you are embossing. For this card I wanted that circle to be flat, so I made circle cuts in the card. The sandwich for this to work was : Multipurpose platform on all tabs, embossing folder with cardstock inside, diffuser placed on top, then the top acrylic plate. Run through the big shot. Note that is you are ever making your own embossing layers, you need to think about and test how you build your sandwich to get the right amount of pressure.
Hope you learned something, thanks for visiting :)

Sunday, February 23, 2014

February 2014 cards

Two lovely cards in Feb 2014, to master some crafting tools : the stamp a ma jig, which is quite the vital tool for accurate stamping; and aqua painter. Circle frames were cute with thinlit dies. Tip - DO NOT overlap dies in your big shot or other die cutting machine. You will definitely bend and possibly break the dies, but you could damage your machine too.

The first card was inspired by Chinese New Year coupled with an appropriate sounding proverb "May happiness be your destination", red and gold. I love the brushed gold washi tape and the cardstock. The popped up lanterns were stamped onto white cardstock, covered in washi tape and then punched out with a 3/4" circle punch.

The second card was a little more arty. The background was painted with an aquapainter onto water color paper with subtle colors of pigment ink. Its not a drastic coloring, but it adds ambience and depth. The dream catcher was made from a doily stamp and a frame made from circle thinlits and lightly sponged. The feathers are from the fine Feathers stamp set - I have been ogling that for ages. Finally its mine :) The feathers were lightly painted over with the aqua painter or blender pen to make them look a little more real. How cool are those candy dots for the beads. Yay. I have to thank Vicky Papaioannou for the inspiration. She did a journal page a little while ago in a similar style.


Thanks for stopping by, please leave a comment :)

Tuesday, January 21, 2014

January 2014 cards

Can you believe is already 2014 - wow, time sure flies .....

With the New Year, comes the new spring Stampin' Up! catalogue, and Sale a bration starts soon....

In January, these are the cards we did at class :

The first was a bargello Valentines. I have to say that this very well maybe the brightest card I have ever made ! lol This small paper pack from SU was a surprise, the colors are so vivid, there is such a massive range of patterns, and they all work so well together.

Bargello is a quilting technique, that works beautifully with paper. The technique will be explained below. The heart shape was cut on my big shot using a thinlit die, and the 'love' was die cut in the crumb cake to show the negative image through to the real red cardstock. A little white bow to finish off and a little white doodling with a signo gel pen :) Cute eh !

 I cut thin strips of cardstock (.5 and/or .75" width) and adhered them to a 6x5.25" piece of cheap copy paper, as seen in the pic below. It is important to totally cover the copy paper with adhesive, so that every single edge of the patterned paper is securely stuck down.  Then you trim the piece so its all straight edges, turn the paper so the strips run horizontally and cut them in your paper cutter (.5 and/or .75" strips). I then had a piece of whisper white cardstock (4x5.25"), where I layed down the thin strips, staggering them to get the bargello effect, and trimmed the excess.

The second card is a punch art, shaped card. I have seen this card online so many times online, but had never made it... until now. Often this card is yellow, as in beer which is a great mans card, but this is a root beer float - I think.

The actual card base is naturals white card stock, that I cut down to make the card 5.25" x 3.75", this is so that with the bubbles and handle added, the card will still fit into a standard envelope. I used early espresso card stock and ink, sponging the bubbles lightly. They are made from the circle punches 1", .75", .5 inch and .75 scallop circle punches. The handle is cut with the large and medium oval punches. Tip :  cut your smallest oval first, then you can more easily align the larger oval over the top of the shape to make your handle. The sentiment was stamped in versamark and embossed in white embossing powder. Tip : Use the dust buddy on the area you want to emboss, so that the embossing powder doesn't stick where your fingers have touched. The three brown strips are 1" in diameter and the bottom edges are rounded with a corner rounder. I hand cut the bottom of the glass for a slightly more realistic effect. The straw is a striped paper from Christmas paper, but you can easily make it with a marker and .5" strip of card stock.


Friday, December 27, 2013

Decembers mixed media project

We did something slightly different this month, a mixed media 5x7 canvas. The canvas came pre gessoed, so we could get straight on with stamping and spraying. 

The snowflakes and Christmas sentiment were stamped in stazon, a permanent ink since we would be spraying next. 

I made sprays using SU spray bottles, rubbing alcohol and a few drops of SU reinker, marina mist. 

Then I began to build the tree, with a variety of designer series paper and cardstock. I loved the higgeldy piggeldy look of the tree. 

For the the tree trunk, I embossed chocolate chip core dinations cardstock with the woodgrain embossing folder, cut the trunk freehand and then sanded the top layer of brown off to reveal the lighter inside of the cardstock.

The layers of paper were glued down, then white acrylic paint highlighted the tree and the outside borders of the canvas. 

Finally doodling, adding washi tape and rhinestones and an embellishment on top of the tree.

The Merry was cut from silver foil paper using the dies in the winter mini catalogue and adhered. The glue of choice was matt mod podge, as it dries practically clear and can be liberally applied with a paint brush.

Few things to remember : 
Do not use a sharpie marker on anything unless its totally dry - unless the sharpie wont work again !
The blue spray, using reinker is water soluble, so if you wet it it will run.
I use alcohol rather than water in my sprays, so they dry quicker. It is definitely smelly though.
To cut the Merry, use a piece of wax paper to get a better cut, and more easily removable from the die.


I loved doing this project with my stampers groups, I especially loved how much they enjoyed it too. Everyone was very proud of their creation and I'm sure it took pride of place amongst their Christmas decorations, as did mine :)

Thanks for stopping by x

Thursday, November 28, 2013

November cards

A couple more Christmas cards for the collection .... lol

Two Christmas cards were completed at the Novembers stampers groups.

The first is using the new labels flip card die. Such an ingenious creation, I love the way the card flips from the front penguin image to the Merry sentiment. I have to say though, its very hard to capture the flip in a photograph, so I have included a few pics.


The cute little penguin is made with the owl punch.

Ingredients :
Stamp set : Snowflake Soiree
Papers : Smoky slate, whisper white, basic black, pumpkin pie, silver
glimmer paper and winter frost dsp
Ink: Pool party and black
Accessories : Owl punch, Stampin' Up! flip card die

The second card is using the beautiful pointsettia stamp in Joyful Christmas stamp set. It was stamped and embossed in white on velum, then fussy cut.

The background is using the watermark technique on crumb cake cardstock (stamping with versamark and letting it dry). The faux stitching is done with a piercing tool and essentials paper piecing pack, the 'sewing' drawn in by hand with white gel pen. What I like about using the paper piercing pack is that the lines will always be straight and the the holes the same size. When you draw them in it looks a bit wonky - suitable to my sewing style and ability ! lol


Ingredients :
Stamp set : Joyful Christmas
Papers : Whisper white, crumb cake and cherry cobbler
Ink : Versamark, cherry cobbler
Accessories : Velum, white signo gel pen, black sharpie to color centre of flower and basic rhinestones, dimensionals to pop up centre of flower.

Monday, November 4, 2013

October 2013 Stampers Groups Projects

I have been meaning to do this Black Magic technique with my stampers groups for a while now, but then SU went and retired their water color pencils ! Its a great technique, and you can use any soft hb pencil, or chalk etc to do it. Using white craft ink (and allowing to fully dry) essentially turns dark cardstock into white where you have stamped, enabling you to color them in. Depending on your coloring technique, the colors you use and products, it can be really vivid on the dark cardstock. We stamped the flowers using the Secret Garden stamp set, colored with watercolor pencils and added pearls to the flowers. The sentiment is from Fabulous Phrases and we used one of the banner dies from the new SU thinlets label card die. The dsp is Modern Medley. I had to use a paperclip to keep the card closed so you can see the dsp behind the card, but took another pic of it open :)


The second CAS card was all about the bling ! We used SU's illuminate glimmer stamp to stamp snowflakes from the Snowflake Soiree stamp set onto the whisper white card stock (see close up pic below). It gives a beautiful frosted, shimmery look to the snowflakes. Tip : make sure its dry before you touch it or it will smudge.

The sentiment, also from Snowflake Soiree (don't you just love when a stamp set contains images and words !!!! ) was stamped onto whisper white card  stock, then the whole piece of card stock was covered in versamark ane embossed with iridescent ice embossing folder, effectively turning it into glimmer paper. LOVE it. Its a great way to add bling and dazzle that wont come off everywhere - glitter can be problematic.

Finally we used Winter frost dsp, for layering and the envelope - which was made with the wonderful new envelope punch board, some island indigo card stock and silver 1/8 ribbon.


September 2013 Stampers Group projects

My stampers groups are underway again, I have 3 groups this year, lots of scrapbookers and card makers, so I am having to think outside the box to keep everyone happy :) Lots of techniques, tools and products that can be used for all paper crafting hobbies.

In September we did a little bit of a mixed media look with a tag :


The techniques were sponging and emboss resist.

Firstly the writing was stamped in early espresso using the En francais background stamp onto very vanilla card stock. Then when it was fully dry (make sure it is unless you will have brown words stamped in your clear versamark !!!) we used the leaf stamp from the Papaya Collage stamp set with versamark. This was then embossed with clear embossing powder. Then we sponged over the whole tag in Old Olive, Calypso Coral and Marina Mist. The ink only sticks to the card stock, the embossing resists the ink, hence the lovely very vanilla leaves you can see :) We sponged the edge of the tag with early espresso, and added very vanilla seam binding and the For You stamp from Chalk Talk stamp set. It was punched with a circle punch and we used the modern label punch and a few pearls.

A ribbon tip : When using seam binding, you can spritz it with water and crumple it up, when its dry it keeps some of that crumpled look, which I happen to like on distressed/mixed media art :)

The other project was using the Papillion Potpourri stamp set and co-ordinating punch.


I like the simplicity of this CAS card. I used I am me dsp, and rhinestones which were colored with sharpie markers to co-ordinate with the colors of the stamped and punched layered butterflies. The shape at the bottom of the card was handcut, to suit the sentiment that people chose from the Loving Thoughts stamp set. This was done by holding the two pieces of cardstock (the dsp and smaller white front) together so that the bottom edges lined up. The white piece was centred. Then we cut both together in one swift movement. When we moved the white up to the centre of the dsp, the cuts are identical. Hope that makes sense - its easy to do, but difficult to explain !

Hope you like it :)

Saturday, June 29, 2013

Flowery thinking of you

I was inspired to make this card, from a card made by Vickypgr on Youtube. She is really creative, if you wanted to check her out.

I made this card for one of my neighbours who is going through some stuff right now, she is a a wonderful gardener and there is always something in bloom in her garden.

I used a retired Stampin' Up! set called 'In Full Bloom'. I stamped the flowers onto the card and also onto scrap white cardstock. I then colored them all with my beloved copics and layered them, curling the top flowers and adding pop dots for more dimension. Doesn't it look just wonderful, so vibrant and cheery. That is a strip covered in washi tape across the middle. I would love to tell you what company makes that tape, but the names are on the packaging of washi tape, so once you discard that, you have no idea where they came from. The sentiment is from Waltzing Mouse Stamps.


Hope your day is cheery and colorful :-)

Friday, June 14, 2013

Kids cards

I love making cards for kids, its so much fun. It bring out my inner child I think ! lol

This was for a boys birthday. I havent used my Sizzix film strip die for ages, but its so great to frame and image. I stamped all those crazy animals and monsters and colored with my copics. I have recently sorted all my stamps into categories, 'nature', 'backgrounds', 'sentiments' etc. The largest by far is my 'animals' box ! lol.

This card is for a nature/bug party and the accompanying gift is butterfly solar lights for the garden - how fantastic is that :-) I'm sure the Birthday girl will love it.

The rose red SU cardstock was the basis for this card because I wanted the jar to stand out. I stamped the jar, from the SU set Perfectly Preserved, in white stazon onto a window sheet and die cut it. The effect is that the butterflies are flying out of the jar. But you got that - right :-)

The butterflies are from two SU stamp sets : Kindness Matters and Papillon Porpourri. I stamped them, colored them with SU markers and then clear embossed them to make them shiny. It really makes the colors pop.

The grass is from a My Favourite Things die, and some gorgeous washi tape brings all the colors together - wish the name of the company was on these rolls of tape !

Hope you like it, thanks for visiting and have a great weekend x