Wednesday, November 26, 2014

Warm Winter Wishes atc

The title of the Wicked Wednesday atc challenge is Warm Winter Wishes, using this gorgeous image called Festival Girl from Time for Tea
Festival Girl is colored with copics and prisma color pencils. Her jacked and boots have been paper pieced and embossed so they are really shiny. I added a knotted band of twine as her head dress. I think she looks like she is having a great time. Simple sentiment of 'cheers' :)

Thanks for stopping by x

Thursday, November 20, 2014

Natural Wonders atc

The title for this atc trade was Natural Wonders. 

I used a stamp from the gorgeous Stampscapes Symmetry sheet #1 Suns & Moons :
 I sponged the background in various colors of distress inks and then stamped over it with black ink on the stamp. I love how the various colors show through. For the wording 'Moonlight'. I stamped the word moonlight, clear embossed it and stamped over the whole word in black ink. The embossing powder acted as a resist so I was able to rub it off to reveal the color co-ordinated word beneath.

I added a layer of clear rock candy crackle paste to my atc, and when it was dry I added a layer of gloss gel medium. You can see the texture more clearly in this pic :
I think I am feeding my moon fetish as it seems to be growing !

Altered Playing Card week 11

Cant believe I am keeping up, am really enjoying this challenge : My week 11 apc's, the theme is snow : 
 The first apc uses paper towel from my spray box as the background. I added acrylic paint and white embossing powder to the ground, edges and sentiment. The image is by Vikki Douglas, colored with acrylic paint and then highlights added with india ink pens. It is fussy cut and glued onto my background. I don't know about you, but I think its a super cute digi image.
 For the second apc I added a layer of Golden acrylic ground for pastels to the card (no gesso), then lay my piece of sprayed kitchen towel on top. I left it for a short time so that the ground was still wet and when I peeled it off, some of the color transfered from the paper towel to the ground, but I could still see the pattern on the card background. I loved that and the gritty feel of the ground on the card, it really added a lot of texture and dimension. I added white acrylic splats, some silver embossed snowflakes and the snowy floor is made with a joy stamp from Stampin' Up!. The bird wreath is a freebie from the Craft Stamper Magazine, layered, doodled and embossed. And the stem of the bird weath is silver washi.
That was a super fun way to pass a few hours :) Thanks Claudine for the challenge x

Christmas atc trade

The final Stampotique atc of 2014 is Christmas :) The requirement for this trade is that you must include a Merry Christmas message to the recipient. My atc's :
The inspiration for this came from the knitwear patterned paper. I thought how cool it would be for Oliver to have a selection of ugly Christmas sweaters. Both in burgundy and multi colored. I like this Oliver image, he always looks so miserable, so thought I would cheer him up. I hope he gets some success in his endeavours for kisses, he should do as he looks so snazzy. LOL

The background was made with distress paint, which acted as a sort of resist when I applied the distress stain. At first I was going to do mistletoe, but I saw someone else in the trade had done that so swiftly moved on ... to sweaters, kisses, hearts, giving etc ... yes, my imagination runs amok sometimes !
 I laughed and laughed when I found this stamp in my stash: "The season of giving" and knew what I had to do was add a free kisses sign. The sentiment is in a set from Clear & Simple Stamps called O'Tree. The heart embellishment is punched out with a small heart punch, hand written and multiple layers of UTEE added. His hat was hand cut from silver paper. Oliver is colored with copics, other than his sweater is paper pieced from Trim the tree designer series paper by Stampin' Up!

So here is a close up of Oliver in burgundy and Oliver in green :) Which do you prefer ?
 I used my illuminate ink pad to stamp some shiny snowflakes in the background, to make it a bit more festive. The atc actually opens up like a card and there is a personalised message inside. 
 So off the little atc's go in the mail, to France and the UK. Hope the girls like them x

Wednesday, November 19, 2014

Stamper's butts ...

Sometimes there is a stamp that crosses my path and I can not resist it .... especially if it is unusual, unexpected, slightly weird or humorous. So here is the latest installment, this is a stamp from Viva Las Vegas Stamps, made into a post card :)  Isn't it fab.
 This idea sprung to mind looking through the VLVS fb group and Wayne Gartley had added a pic of a butt with the sentiment "I suffer from Stamper's Butt". And I thought, "Me too" ! LOL I spent all weekend at a craft retreat, so this stamper's butts seemed appropriate as we sat on them for a loooooong time. LOL 
I stamped my image in brown archival ink and colored it with my inktense pencils. The background was made using paper towel from my spray box, with some molding paste and stencil. Love that the paste takes on the colors of the dylusions ink from the paper towel.

Thanks for stopping by, and appreciating the stamper's butts .... LOL

Altered Playing Card week 10

This weeks theme is outside the box, quirky and whimsical. I think I definitely achieved that ... lol.

My apc's : 
The first is a distress paint background, with a head and partial sentiment from Dylusions stamp sets. The broom handle is from the housewife stamp from Lost Coast Designs. I doodled the lines and embossed with clear powder. It was very interesting to see how the paint reacts on the gesso'd playing cards. Distress paint separates and cracks, other acrylics dont. I am learning so much about the uses and limitations of my stash in this challenge. Enjoying this challenge on so many levels :)
 The second apc used an image transfer for the face, with Paper Artsy chalk acrylic paint. The legs and crown are from a set by Dylusions, copics colored. The wording and bar code are from Stampotique. The ground was made by adding a little blue flocking when the paint was wet, and I edged the apc in black ink.
 Thats my week 10 complete, thanks for visiting xxx

Altered Playing Card Week 9

A fun week 9 of the altered playing card (apc) challenge.This week is sponsored by Susana's Custom Art and Card Design (SCACD) so I pulled out my wonderful SCACD stamps ...

For the first apc I used this funky and cool steampunk fish called Incandescent Light . I colored him with copics and fussy cut him. Unusual fish call for unusual background oceans, and so the pink and turquoise dylusions background came about, and I added glitter paper circles. Initially I was planning to just use a circle behind the lantern, but I loved the look against the background, so they circles multiplied. The apc is edged in Stampendous aged copper embossing enamel. The sentiment is included with incandescent light image :) These fish always remind me of Finding Nemo, but this one is waaaay cooler :)
 The second apc uses a very different image from SCACD, this is one of the images from the archeological dig set. I painted the background with Paper Artsy chalk acrylic paint in stone, and while the paint was wet I sprinkled a little flocking in brown and pale blue - you can just see the tiny speckles around the image. When the paint was dry I stamped the dinosaur skeleton image in brown archival ink. Then I used a brick effect stencil and green distess ink on the background, added some washi tape, some jute and finally a thin layer of Kroma crackle in some spots around the edges. Doesn't he look great :) 
 Here are my two apc's together for week 9. 
Thanks for stopping by, please leave me some love xxx

Falling for Fall atc

This weeks sponsor at Wicked Wednesday atc challenge blog is Sami Stamps. I used this wonderful image called Acorn in my hand. My atc, which I also entered into the Sami Stamps anything goes challenge 019 :
The background is made by combining gel medium with a payne's grey acrylic paint and applying to the card stock with a palette knife. I love the texture and its so malleable, it wont crack easily. Whilst it was still wet I added some Spampendous yumminess .... Rose color fragments and pearlised mica fragments. They are so wonderful, and I love the effect of leaves on the ground and floating in the air. I took a pic with the light reflecting off the mica - stunning isn't it. You can see the background texture more clearly here too.

My image is colored with copics, and I added glitter to her wings with my wink of stella pen. Her shirt was paper pieced and then colored to match her pants. You can just see the pattern through the pink. I fussy cut her and glued her to my atc.

I didnt want to add too much to this atc, to me it felt like more of a work of art, it was very serene and atmospheric. I liked it a lot. So I didn't mat it, doodle on it or add any more detail  or sentiment- I liked it just as is.

Thanks for stopping by, maybe go and play in the atc challenge this week - if you have a little time, why not ?

Ciao for now x

Tuesday, November 18, 2014

O Christmas Tree

For this card I used one of the gorgeous trees from the four pack : XMAS-154, coupled with the northern lights sponging technique for the sky : 
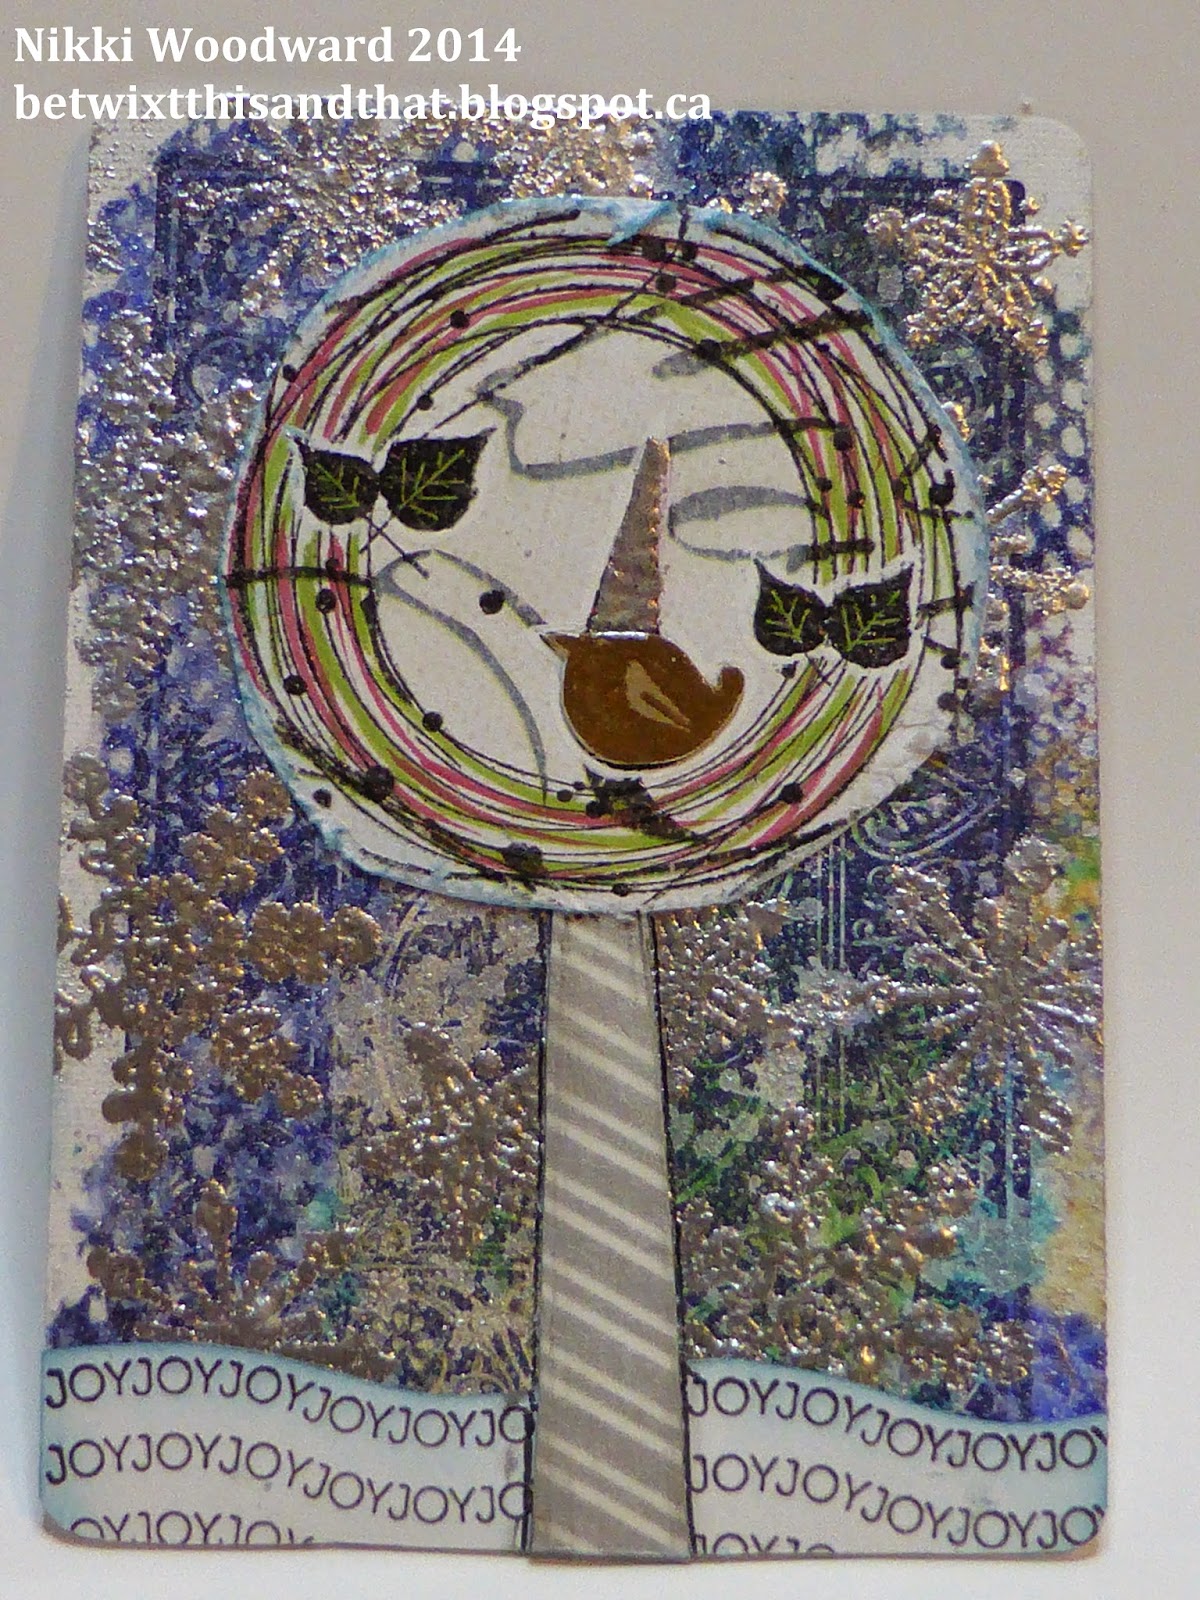
Here is a close up of the tree - doesn't it look great.
For the tree I used distress ink and then put some gold onto my craft sheet and lightly touched the tree to it, and of course I added more to the star on top. Then while the paint was still wet I sprinkled a little rock candy glitter from Ranger. It adds a little shine, texture and interest to the tree. 
 The glitter paper was cut to size and added to the back of the tree :
Below I show the stages of the northern lights sky, using regular pigment ink and sponges :
Firstly add your lightest color, in this case I used yellow :
 Then your next lightest to surround the yellow, I used turquoise :
 Then my final color was added, the darkest, purple :
 Up to now it really doesn't look like much, the magic happens when soem black is added to accentuate and pick out certain colors and areas of the sky. Be careful not to add too much black :
For the tree I used distress ink and then put some gold onto my craft sheet and lightly touched the tree to it, and of course I added more to the star on top. Then while the paint was still wet I sprinkled a little rock candy glitter from Ranger. It adds a little shine, texture and interest to the tree. 
 The glitter paper was cut to size and added to the back of the tree :
Thanks for stopping by, Nikki x

Simply wonderful

I made a cute card using an image called Pint of Cherries Birdie by Mary Ellen Smith
I colored the image with copics and prismacolor premier pencils. Adding some white gel pen highlights to the cherries.

The 3d cherries are made with a Stampin' Up! simply pressed clay and a Martha Stewart mould. When it was set (in about 12 hours) I painted them with acrylic paint. They made the perfect  cherry embellishment, along with the ribbon.

Thanks for stopping by x


Eccentric chubby mermaid ?

I love the detail in the images by The Chubby Mermaid, they are so fun and saucy :)

Here is a postcard I made using Alice in Waterland II :
 I cracked open the big box of prisma color pencils for this project, Oh they are sooo lovely. She is colored exclusively in prisma, just a little black india ink pen for a few details :) Isn't she sweet. Her hair is actually a mixture of brown and metallic gold, but its maybe a bit hard to see in the pic.
 The background was done with gesso, which I textures and then colored with gelato's, a layer of gel medium then I sponged with brown distress ink to pick out some of the background detail. I added some white acrylic splodges and my wording, using two different alphabet sets. The wording is meant to be a little flamboyant, because she obviously is, sitting there in her teacup with all her favorite items around her.

Thanks for stopping by x

Wednesday, November 12, 2014

Something sweet atc

This weeks Wicked Wednesday title is "Something Sweet" or "Hearts" and the sponsor is A Random Fan. I used this sweet image called Baker Arie for my atc :

She is colored with copics and I cut up a recipe card to make her. I added washi tape and ribbon, along with this awesome heart nickel charm by Darice. Seemed appropriate as she baked that yummy pie :)
Ciao, Nikki x

Tuesday, November 11, 2014

Card class

Couple of cards we made in class this week.

The first uses Ornamental pine stamp set. This card is a simple one layer card so very easy to reproduce in big quantities. It is cased from the Stampin Up Christmas catalogue. The branch and cone are embossed with white embossing powder. The blue is the gorgeous lost lagoon :
 The second fun card uses the new stamp set Santa Stache. His hat is colored with the new blendabilities, alcohol markers in Cherry Cobbler. His moustache is die cut with the die. Add a sentiment, a bit of embellishment and a quick and easy card. 

Monday, November 10, 2014

Euroclown brightens you day ...

One of the sponsors of Not Just Cards challenge blog this week is Rick St Dennis. When I saw this Euro clown with balloons image I fell a little bit in love .... Here is my Guest dt project, another page for my positive affirmation hand made journal :
My idea was that you would see muted colors but the brightly colored balloons would be the focal point. I hand wrote the words, with a Faber Castell Black india ink pen - they come in various thicknesses.
This is my creative process : 

I resized and printed my image onto X-Press It paper, my preferred copics/digi paper. I then got my washi tape out and covered the background, tearing and cutting the tape around the image.
 Then I added a layer of gesso over the washi to tone it down. Some washi can can have more of a waxy coating, and it gives a great, sort of distressed look as the gesso lightly beads on it. I colored the clown and balloons copics, added my light reflection in the balloons with a white gel pen and then the crystal effects or diamond glaze to the balloons and clowns eyes.
 A close up of the copics colors I used and the colored image : 
The final thing was to add the green embroidery thread. To do that I cut slits with a craft knife, above and below his hand and carefully fed the thread through. I used a small glue dot to adhere the thread to the bottom of the balloons, but the middle yellow one I used a needle to piece the paper and feed that thread through to the back. I then lightly sponged the edge of the postcard and matted it onto black card stock. 

What a fun project, love the Euro Clowns x Thanks for stopping by today

Wednesday, November 5, 2014

Wicked Wednesday does Oddball ...

Fab sponsor this week at Wicked Wednesday atc challenge blog, a Lizzy Love image, Ellie the Elf #120, from Oddball Arts. ATC title is Skully XMas :
 She is such a sweet looking girl, so innocent. I thought this reply to Santas question would be perfect. "I promise I've been good".

She is colored with copics and prisma color pencils. I used labels 4 and sponged lightly around her in distress ink. I added a shiny sequin to her Santa Hat.
If you are feeling included to make a Christmassy atc, here is your chance, go to the Wicked Wednesday atc challenge blog for some inspiration from the brilliant dt, create and link up your work :)

Bye for now, thanks for stopping by, Nikki x

Tuesday, November 4, 2014

Arty whimsical flower tag

I really like some of the simpler whimsical images from The sailing Pineapple. Here is my tag for this weeks tag challenge :
The flower is colored with copics, prisma color pencils and Faber Castell india ink pens. White highlights added and then the flower was fussy cut.

The background is dylusions sprays in red and black, white ink through a stencil, then white splatter with acylic paint. Embellished with green washi tape and bakers twine.

I loved the simple sentiment, create. I certainly had fun creating this. If I dont walk away from a crafting session with at least 5 ink stains on my hands I am disappointed .... LOL. I love turning a simple image into something, adding depth and color.

Thank you for stopping by today, go and check out the tag challenge on The Sailing Pineapple blog.

Sunday, November 2, 2014

Intriguing atc ...

I am very happy to be part of the design team at Lost Coast Designs. I have been a fan of their gorgeous, unique, quirky and detailed stamps for quite some time.  I will be creating alongside an incredible design team, all very talented.

I would like to share with you a crocodile in top hat and tales. After all, its not every day you see a crocodile so dressed up is it ! lol
I stamped this very smart fellow onto kraft card stock, colored him with inktense pencils. I doodled / zentangled the background and the words are handwritten using my artist pitt pens. The white detail is added using a white prisma color pencil. I embossed the whole thing to give it some shine and depth.

So please visit the Lost Coast Designs website, or the awesome blog, Lost Coasters Review, where there is fabulous inspiration are regular challenges.

Thanks for visiting and sharing my excitement :)