Showing posts with label Southern Ridge Trading Co. Show all posts

Monday, June 1, 2015

Chipboard mask

Masculine Birthday Card -  "Happy Birthday Dear You" - do you like the play on words ? LOL
I make many, many male cards. You  have to get creative with images and colors, and often techniques.  For this card I have used the larger piece from Southern Ridge Trading Company, SPO-392 as a mask.

I used Dylusions sprays for the background, and did a little stamping. Dylusions sprays react when wet so you can get some cool blending techniques, but its easy for it all to turn muddy brown. You could sponge the background with inks or use any sorts of sprays and stamps. You are just aiming for an interesting and colorful background as part of it is about to get covered up. 
The sprayed and stamped background :
 I added some temporary adhesive to the back of the deer and placed him on the card. I then sprayed with brown Dylusions. 
The chipboard piece SOP-392 in place before spraying with brown :
After spraying I dabbed off some of the brown ink and this is the gorgeous image I was left with :)
I used a co-ordinating piece of cardstock and stamped the sentiment, edged the card with archival ink and matted it onto a lighter brown card stock. And tadaar, its finished :)

Its a pretty cool technique, you will always get a different result and you get to use your pieces multiple times if you like. Maybe you will feel inspired to give it a go :) Nikki x

Friday, May 1, 2015

Spring

For the spring challenge over at Southern Ridge Trading Blog I have made a card, spring is all about rebirth and regrowth, my tree is blossoming, my returning birds are nesting :
The tree is : NAT-333 and the birds in flight are : NAT-615 - coming to the website soon.

The background is an emboss resist with a stencil. The tree was painted with acrylic paint.
The grass is painted with acrylic paint and a dry brush, and the words lightly stamped in the grass "All things grow with love".

Few details about the tree :

Once I had created my background, I painted the tree and when the paint was still wet I stamped it onto my card. I know, it looks a total mess doesn't it, but there was method in my madness. I wanted to give the tree some depth, emphasize its dimension.
I used a thick body acrylic so that I was able to add texture to the trunk, then each leaf was meticulously painted in a pale green, with the shadow added with aqua acrylic. 
 The final touch was to add a little dot of liquid pearls to simulate the blossom. I had decided to put the tree off the card and trim the edge. I then glued these discarded branches onto the remaining tree.


Saturday, April 18, 2015

Some card organisation

I have been meaning to make something like this for absolutely ages. It's such a nuisance to forget Birthdays and other special occasions, or having to create a card at the last minute. This is now officially a thing of the past : I present a custom made book to store my cards and record special dates. Here is the cover :
I didn't want the cover to be too fancy, as it will be used a lot and I didn't want things falling off. I may write something in the frame at some point, but the paper is so pretty ...

And on the inside of the book there are 12 page pockets for cards, with space to record the special events that are happening during that month. Once I have written the dates in, I wont forget to make cards :)
When is your Birthday again ? LOL

To make this book I used custom sized chipboard 0.060 depth from Southern Ridge Trading Company. The cover is 8 inches x 8 inches, the inner page pockets are 7.5 inches x 7.5 inches and made with 110gram card stock.  I selected this chipboard in particular because of the strength, durability and quality. If I had made this book from regular cardboard it would not have held up over time, it would have buckled under the weight of the cards in the pockets. I knew I needed a quality product.

For the cover I also used a frame, FRA-132. I painted it with white acrylic paint, then in a pale green - with a dry brush, you don't add too much water. Did you know that you tend to get a truer paint color when you paint something white before you paint it with a color? When the paint was dry I lightly touched a blue ink stamp pad to the surface, and clear embossed it - can you see the reflective nature of the blue in the pic below. I sponged the edges in brown distress ink. Finally I wove some flowers, also for sale from Southern Ridge Trading Company, through the trellis. It was all glued firmly onto the front of the book.

I punched holes with my crop-a-dile and used 1.5 inch book rings, with co-ordinating ribbon tied to them.

And finally, a view from the side :

Doesn't organisation feel GREAT ! LOL I think this little book will get a lot of use.
Thanks for stopping by and I hope you found some inspiration here :)

Monday, April 6, 2015

Easter and spring

 Hey, I made an Easter card, I actually think it may be the first I have ever made ! LOL

Nothing religious though, more like white chocolate meets milk chocolate bunny :)
 For this card I did a mixed media acrylic paint background. The filigree cross is from Southern Ridge Trading Company CEL-538, and I painted it with paynes grey acrylic paint and gold acrylic.  The white bunny is also from Southern Ridge Trading Company CEL-546. Its a set of 4 bunnies. The bunny was painted in white acrylic and I sprinkled pink sugar beads on when the paint was wet. 
 The chocolate bunny is from Lost Coast Designs, its an awesome rabbit silhouette with flowers engraved into him. I stamped him in versamark, added heat and stick powder (a glue embossing powder), then heated it and added the pink sugarbeads. I then sprayed him liberally with chocolate brown dylusions ink and added a dot of diamond glaze/crystal effects for his eye. Doesn't he look delicious :)
The grass was cut by hand from an additional strip of the mixed media paper I colored :) 

This months challenge at the Lost Coast Designs blog is 'spring', why not go and check it out, and using a Lost Coast image create something spring themed :)

This months challenge at Southern Ridge Trading Company is anything goes, check it out :) 

Thanks for stopping by x

Friday, March 20, 2015

Altered Playing Card Challenge Week 20

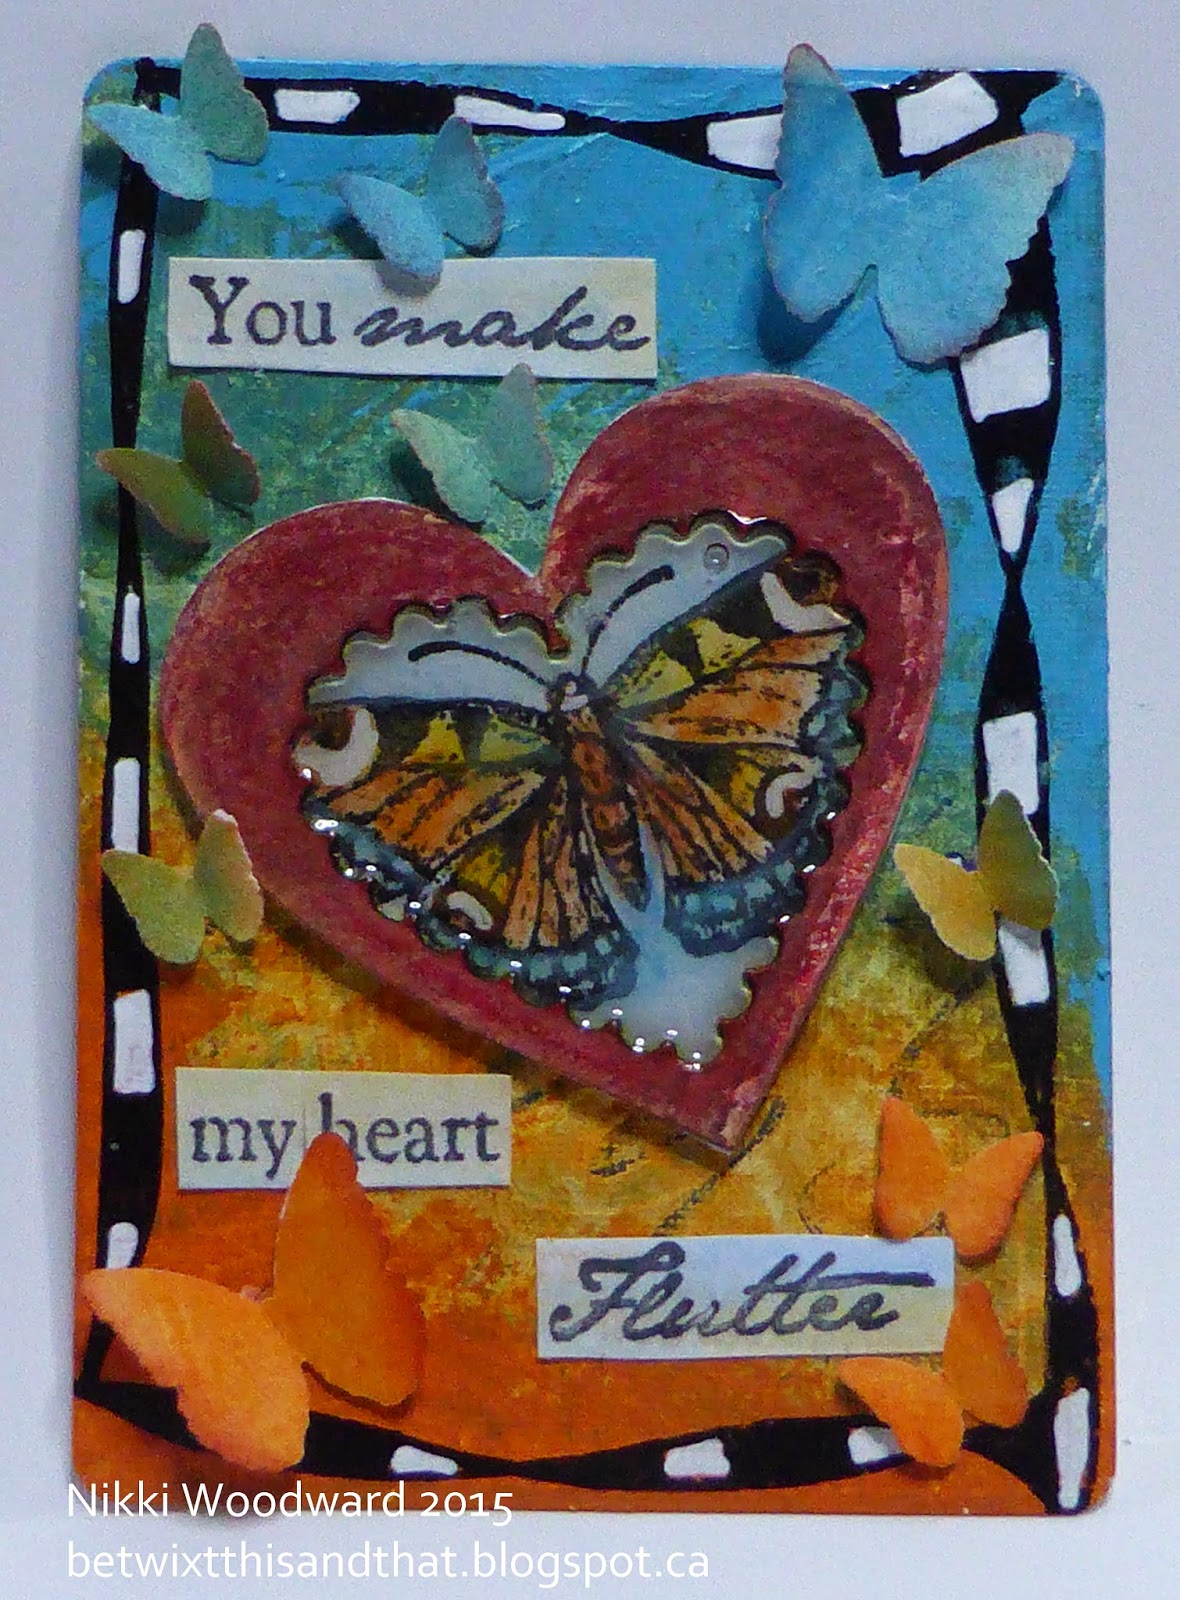
My first Altered Playing Card features a smaller piece than is available in the  Southern Ridge Trading Company store, its the outer heart from HRT-479. 
 You make my heart flutter ... I loved that sentiment coupled with the imagery.

The background is painted with acrylic paint and I have doodled around the edge.

I actually further embellished this, adding butterflies in co-ordinating colors to give an ombre effect. Not sure which I prefer, they are both  nice.

What I really like about working with chipboard is the stability and depth of a piece. Here I had stamped and colored my butterfly image, the heart was painted and sanded. Then when it was all glued down I was able to add a thick layer of diamond glaze. It feels so scrumptious. 

The second Altered Playing Card :
The background is acylic paint, the heart is a die cut with origami b&w paper. I loved the sentiment that Claudine used, so I used it too. The dots were added with my black gelli role pen.

The two APC's :
Hope you found some inspiration here, thanks fro stopping by x

Thursday, March 5, 2015

Bee Ware ATC's

I have been creating Artist Trading Cards again, they are small, 2.5" x 3.5". I have used the gorgeous chipboard honey comb, MIS-274. I have used this before, but its just something I keep coming back to and working on this smaller scale was really fun. Its so easy to cut the chipboard, so one size fits all :)
My three ATC's, all slightly different :
 There are a number of elements on my ATC's, including honey in the comb, this is made with gold acrylic paint and crystal effects. The gorgeous bee image is from SCACD, a steam punk bee called Bee Ware - isn't it great.

A close up of my favourite ATC of the three, you can clearly see the embossing, the cogs, honey, chipboard and flowers - also for sale by SRTC at events. The bee and sky are colored with copics. You will see the embossing around but not on the bee - I did this by making a diffuser and then running it through my big shot. Love creating the metallic feel, then adding some flowers to soften it up.
Thanks for stopping by, and hope you found some inspiration here :)

Wednesday, February 18, 2015

Fishing Fun ATC

Making an ATC for Wicked Wednesday this week using this cute image from Squigglefly called 'A good catch Max'. The sentiment is from the same company too. I paired the image with the perfect heart from Southern Ridge Trading Company. This is one of the hearts I cut off from the border strip BOR-150 :
 The heart is gesso'd and painted with acrylic paint, the sentiment added to it.
The boy and sky are colored with copics, the sky I pounced with blending solution on a blending tool. The water is glittery wrapping paper scrunched up, and I made a hook out of wire :)

Thanks for stopping by x

Friday, February 6, 2015

Love is all around ...

I made some ATC's for a new Mixed Media trade group I joined. This is my first trade, and I had that  nervous butterflies in my stomach sort of feeling. LOL. I hope my trade partners like their ATC's. 
The title of this trade is Arrows, but with Valentines just around the corner, I thought I would include that element too :) The hearts are actually from set HRT-078 from Southern Ridge Trading. I loved how intricate and different they are. I gesso'd them, painted with acrylics and then UTEE'd them. I love the glossy and hard finish, as you can see clearer in this pic :
My initial thinking for this ATC was on a much broader scale, hence the newsprint background. I wanted to say "Contrary to what the media would have us believe ..... Love is all around". I can explain that now on my blog, although it isn't necessarily apparent from looking at the ATC's. So much bad news all the time in the media, but what isn't reported is the good deeds, the love, friendship and goodwill the world over. I wanted to celebrate this more positive aspect of life :)

Always for an ATC trade I make one for myself and the others are traded, in this case three will be mailed. But which one to keep ? Decisions, decisions ... Decided to keep this one :
Thanks for stopping by, Nikki x


Tuesday, January 20, 2015

Birds in the sky ....

I have had the Nina Simone song, Feeling Good, stuck in my head for a few days now, so thought I would celebrate it and create ... A little artistic licence in the words there :)

Here is a mixed media card using chipboard pieces from Southern Ridge Trading Company, NAT-295 and BOR-151
 The background is created with torn paper, gesso and blue and green acrylic paint. I then added some molding paste through a stencil and orange acrylic paint. The bird and heart was painted with brown and gold acrylic paints and clear embossed. They were adhered and then I doodled with a brown thin line marker : 
The sentiment is handwritten on a diecut from a Spellbinders set.

So fun, thanks for stopping by and I am happy to say this song is no longer playing in my head :)

Monday, January 5, 2015

Awesome Dude

A Birthday soon, and I had the most wonderful things to use. This is a project for Not Just Cards Challenge blog and also for Southern Ridge Trading Blog post.
 I have used a digital image from Kenny K called Teen Idol and I colored him with copics. I also used a wonderful chipboard circular star frame from Southern Ridge Trading Co. Here is a close up : 
I actually only used part of the Teen Idol image because I wanted him to be in the middle of my circular star frame, here is a pic of the whole image : You have to admit he is a pretty awesome dude.
The background is made with dylusions sprays, then the stars are stenciled with nougat colored molding paste and a thin sprinkle of Shabby blue Stampendous embossing enamel added, and heated. For the frame I painted it with nougat chalk acrylic paint and added a little crackle glaze and the shabby blue embossing enamel which I heat set. I lightly sponged the edge with brown distress ink. The words 'Awesome Dude' are from a Waltzing Mouse stamps sentiment set.

I framed it in a black 5" x 7"  frame and added some painted and embossed star cut outs.

Hope the boy likes it and thanks for stopping by x

Friday, December 12, 2014

Some special gift tags

Using the beautiful deer wooden XMAS-456 embellishment from Southern Ridge Trading Co, I made up some gift tags. These are actually atc sized (3.5" x 2.5"). 
The deer is so perfect, I didn't want to add anything to it, but the background is created by swiping victorian velvet distress paint over a manilla tag leaving some areas clear. Then I added picket fence distress stain and the paint acts as a resist.  I added a layer of  distress crackle paint in clear rock candy. Look how gorgeous it is when dry, it highlights the deer beautifully :
I stamped the ground / postmark in baked brown sugar Stampin' Up! ink on top of the crackle paint and added the seam binding which was colored with the victorian velvet distress paint. I mounted the tag onto baked brown sugar card stock and  lightly edged it with Stampendous shabby pink embossing enamel.

I entered them into the Tag Along challenge this week #68 - its all about reindeer :)
Yay, got picked in the top 3 :)

I also used these as ATC's to trade, as part of the OK ATC trade I facilitate :)

Thanks for stopping by.

Tuesday, November 18, 2014

O Christmas Tree

For this card I used one of the gorgeous trees from the four pack : XMAS-154, coupled with the northern lights sponging technique for the sky : 
Here is a close up of the tree - doesn't it look great.
For the tree I used distress ink and then put some gold onto my craft sheet and lightly touched the tree to it, and of course I added more to the star on top. Then while the paint was still wet I sprinkled a little rock candy glitter from Ranger. It adds a little shine, texture and interest to the tree. 
 The glitter paper was cut to size and added to the back of the tree :
Below I show the stages of the northern lights sky, using regular pigment ink and sponges :
Firstly add your lightest color, in this case I used yellow :
 Then your next lightest to surround the yellow, I used turquoise :
 Then my final color was added, the darkest, purple :
 Up to now it really doesn't look like much, the magic happens when soem black is added to accentuate and pick out certain colors and areas of the sky. Be careful not to add too much black :
For the tree I used distress ink and then put some gold onto my craft sheet and lightly touched the tree to it, and of course I added more to the star on top. Then while the paint was still wet I sprinkled a little rock candy glitter from Ranger. It adds a little shine, texture and interest to the tree. 
 The glitter paper was cut to size and added to the back of the tree :
Thanks for stopping by, Nikki x

Friday, October 31, 2014

Its a Marvelous night for a Moondance ... Van Morrison

I was really inspired to play in a more arty challenge this week, over at The Gauche Academy blog. The October challenge was moon related, inspired by “Le Voyage Dans La Lune” and this is the mood board :
Loved loved loved this whole thing. So clever, so well considered, a real artistic challenge. Oooh la la ... I remember this from years ago, the movie and music. Love how whimsical and free it is. Some things really just are better in black and white.

Here is my creation and I just love the ambience I created here  :
My fairy is of course dancing on the moon to the classic Van Morrison song "Moondance". Dont you just long to be free like her and dance in a whimsical, non judgemental way ...

I used the moon die from Ranger and paper that was in a 2007 edition of the Stampers Sampler magazine. The dancing fairy is an image from Artchixstudio, #147 winged nudies and I think she is awesome. The chipboard flourish is from Southern Ridge Trading Company, and I love the shape and how I could get the letters to dance across it. I colored the flourish and stars with inka gold. Below the flourish is a strip of Ranger tissue paper with musical notes, adhered with gel medium. Each letter was stamped individually and cut out.
I had a little aha moment with the background. My faithful old spray box had come to the end of its life, it was warping and totally ink saturated. As I broke up the box the light caught the shimmer ... and I knew ... this was my background : 

I had a really lovely time making this project, yes, a little risque to use a nude image but it is very tasefully and artistically done. This cardboard piece will form the back cover of my positive affirmation journal when I bind it. I wish you could see all the colors and layers in this background, its stunning.

Thank you for stopping by and if you get the chance, go and watch the wonderful video, All I wanted was the moon :
https://www.youtube.com/watch?v=bLXt2KBOYP8

Saturday, October 18, 2014

Balloon Overload ...

I made this fun 6x6 kids Birthday card using frame FRA-134 from Southern Ridge Trading Co, which I painted with acrylic paint and then added some white highlights to :
The idea came from wanting to frame the little Close to My Heart monsters and then for the balloon strings to be interactive with the frame. The middle monster is having a hard time holding into all those balloons ... lol
The balloons are just circle and oval punches, sponged around the edge and embossed in clear powder. It is compulsory when doing balloons to add the white light reflections - adding this suddenly made the balloons seem real and shiny.

Close up of my copics/Stampin' Up! write marker/prismacolor coloring .... I think they look fab.
If you look up this frame, FRA-134 you will see that the frame on the website is larger than mine. Guess what, I trimmed it down ! I used my Tonic scissors and just cut off the large corner pieces as I felt they were too ornate for this project, but I loved everything else about the frame and its size. Having a chipboard piece/s doesn't mean you have to use it exactly as is ...

The pieces I cut off are awesome, I am thinking some sort of boarder, maybe in my art journal :
Thanks for stopping by, hope you found some inspiration and ideas here :)
Nikki x