Welcome to my creative adventures, my quirky little corner of fun and sanity !
Monday, December 17, 2012
Santas Candy Elves
I saw these cute little elves that another Su demonstrator, Vicki Hodgman, had made, I just had to case them. How adorable are they. I just love punch art :-)
SU demonstrators XMas party
We had a shoe box exchange at the party - lots of pressure to prepare something that my talented peers will remake ! yikes. I came up with a very simple card, which happened accidentally as I embossed the whisper white cardstock the paper split. So I just cut it out and some other shapes with my craft knife and adhered nice designer paper behind. Couldn't be easier really, but looked much more complicated.
Friday, November 23, 2012
Novembers SU get togethers
A Christmas themed month again - unusual for me, especially as I dont personally make any Christmas cards ! Wierd for a devout card maker.
The first card was a glitter demo.
I cased this magical little snowman from talented SU demonstrator Annette John - thanks Annette for the inspiration.
The glitter on the embossed snowflakes is SU dazzling diamonds, adhered with a little two-way glue. The strip across the bottom is double sided tape. It is very easy to apply this tape in a straight line and get such a straight glittered ground.
I printed a 'let it snow' sentiment and some people punched them out and added them to the card front.
SU recipe :
Cardstock : Baja breeze, whisper white, pumpkin pie
Tools : 1.75 and 1.25 circle punch, Northern Flurry embossing folder
Embellisments : Dazzling diamonds, midnight muse stitched ribbon, marker to draw in arms and mouth
The second card was all about using the negative image.
Last month we die cut little gingerbread men, but this month we are working the negative image that a die cut leaves, using the candy cane die.
The how to : I die cut the candy cane in the crumb cake (kraft) cardstock, put it in place on the white and drew a faint pencil outline of the candy cane. I then knew where to put my big glue dot, to cover the pencil outline. Short pieces of ribbon were then cut and adhered to the big glue dot. The Christmas sentiment and faux stitching were done before the crumb cake (kraft) cardstock was pop dotted into place, and the bow added with a small glue dot.
It seems complicated, but really isn't.
Here is a video by SU demonstrator Dawn Olchefske : http://www.youtube.com/watch?v=Kkznt9WB-Eg&list=UUE2h52pY7ELbAENtDm7MbxA&index=20&feature=plcp
We also made a co-ordinating gift tag :
Su recipe :
Stamps : single Christmas stamp from Seasonal Saying stamp set using raspberry ripple ink
Cardstock : Raspberry ripple and crumb cake (kraft)
Embellisments : Raspberry ripple and white ribbon, piercing mat and essentials paper piercing pack, white gel pen, jumbo sticky rounds (aka big glue dot)
The first card was a glitter demo.
I cased this magical little snowman from talented SU demonstrator Annette John - thanks Annette for the inspiration.
The glitter on the embossed snowflakes is SU dazzling diamonds, adhered with a little two-way glue. The strip across the bottom is double sided tape. It is very easy to apply this tape in a straight line and get such a straight glittered ground.
I printed a 'let it snow' sentiment and some people punched them out and added them to the card front.
SU recipe :
Cardstock : Baja breeze, whisper white, pumpkin pie
Tools : 1.75 and 1.25 circle punch, Northern Flurry embossing folder
Embellisments : Dazzling diamonds, midnight muse stitched ribbon, marker to draw in arms and mouth
The second card was all about using the negative image.
Last month we die cut little gingerbread men, but this month we are working the negative image that a die cut leaves, using the candy cane die.
The how to : I die cut the candy cane in the crumb cake (kraft) cardstock, put it in place on the white and drew a faint pencil outline of the candy cane. I then knew where to put my big glue dot, to cover the pencil outline. Short pieces of ribbon were then cut and adhered to the big glue dot. The Christmas sentiment and faux stitching were done before the crumb cake (kraft) cardstock was pop dotted into place, and the bow added with a small glue dot.
It seems complicated, but really isn't.
Here is a video by SU demonstrator Dawn Olchefske : http://www.youtube.com/watch?v=Kkznt9WB-Eg&list=UUE2h52pY7ELbAENtDm7MbxA&index=20&feature=plcp
We also made a co-ordinating gift tag :
Su recipe :
Stamps : single Christmas stamp from Seasonal Saying stamp set using raspberry ripple ink
Cardstock : Raspberry ripple and crumb cake (kraft)
Embellisments : Raspberry ripple and white ribbon, piercing mat and essentials paper piercing pack, white gel pen, jumbo sticky rounds (aka big glue dot)
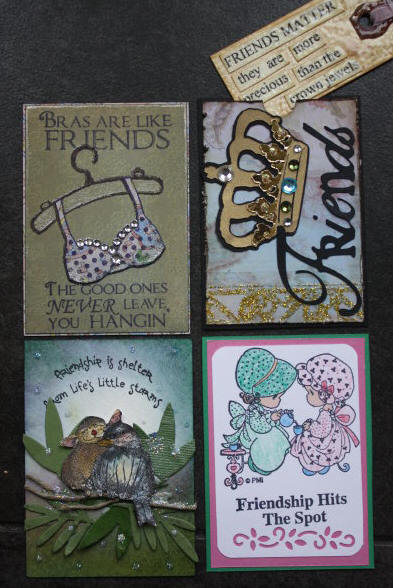
November 2012 ATCs - Friends Matter
This months topic was 'Friends Matter'. I loved how different everybodies were this month.
Mine was underwear related ! lol I bought this Skipping Stones Designs stamp set ages ago and have used it quite a few times. It was the perfect set for this ATC topic.I used a piece of Stampington and Co paper, sponged with a variety of distress inks. I stamped the sentiments in SU concord crush ink, then stamped and heat embossed the bra and hanger, paperpiecing the bra with some random patterned paper I found in my paper drawer. Do you like the glittery detail on the bra, edging and on the hanger ? It is done with a Sakura clear gelly roll pen. A few jewels add the bling.
On the back of my ATC, I did a variety of the bra's in the stamp set, in a few colors. Like I say, if I spend so much time on the front - may as well make the back nice too :-) Its these little details that count.
This months topic was 'Friends Matter'. I loved how different everybodies were this month.
Frog fetish continues ....
I love frogs, and what an adorable stamp from Animal Spirit Stamps by Sue Coccia, if you can see the detail inside the frog, of a bear, butterfly, fish, turtle, snake, dragon fly and ladybug. Did I miss anything ?
Art Impressions Stamps
A little while ago I had a little spending spree on Art Impressions stamps - they are so great - funky and quirky. I am slowly working my way through stamping and coloring them.
I love this lady dancing, and coupled with the paper pieced dress and ribbon background, its perfect.
I didn't have a suitable sentiment so I typed one out on my pc and printed it, accompanied by a nice glimmer brad.
I love this lady dancing, and coupled with the paper pieced dress and ribbon background, its perfect.
I didn't have a suitable sentiment so I typed one out on my pc and printed it, accompanied by a nice glimmer brad.
Soccer Star
My best friends super-soccer-crazed-star daughter just turned 7. What better than a soccer inspired card, to accompany the official Arsenal scalf we sent :-) She loved it.
Recipe :
SU retured background stamp and ball
Spellbinders stars
MFT grass die cut
Recipe :
SU retured background stamp and ball
Spellbinders stars
MFT grass die cut
Christmas Birdhouses
I saw this image stamped and colored and just knew I HAD to have this stamp !
It is made by Northwoods Rubber Stamps, and is a deeply etched rubber stamp on a wood block. So easy to ink, so easy and beautiful to stamp with.
I spent a lovely few hours coloring one night, and it is finally official ! I can not longer just sit and watch tv, coloring with my fantastic copic markers makes it so much more fun :-)
It is made by Northwoods Rubber Stamps, and is a deeply etched rubber stamp on a wood block. So easy to ink, so easy and beautiful to stamp with.
I spent a lovely few hours coloring one night, and it is finally official ! I can not longer just sit and watch tv, coloring with my fantastic copic markers makes it so much more fun :-)
Yee Haw
Lovely new Waltzing Mouse Stamps - ooohhh, aggghhh, sigh ..... lol
They look so beautiful in the packaging, its so hard to open them and 'dirty' them, but 'dirty' them I must !
The stamps first outings was for a couple of friends Birthdays. HAPPY BIRTHDAY MARK and POLLY
I searched high and low for a sheriffs badge die cut - Quick Kutz had one - thanks ebay :-)
Do you like the metallic, aged embossed look of the badge ? Stampendous aged copper embossing enamel - how gorgeous is that ! I also embossed around the edge of the central image.
The multi horse thing thats going on there is an idea I saw on the WMS website - I loved it so had to case it. It is so easy to do. I used the same colour ink each time. For the first horse on the left I inked up the horse stamp and stamped it on scrap paper twice, then onto my card front. The middle horse was inked up and stamped off once onto scrap. The final and darker horse was inked and stamped straight onto the card. Cool or what eh.
My favourite things about this card is how well the background native blanket image stamped - LOVE that. The other thing I really like is the boots, stamped in Stampin' Up!s raspberry ripple and then UTEE'd. The little pearls just add a bit of interest and dimension.
They look so beautiful in the packaging, its so hard to open them and 'dirty' them, but 'dirty' them I must !
The stamps first outings was for a couple of friends Birthdays. HAPPY BIRTHDAY MARK and POLLY
I searched high and low for a sheriffs badge die cut - Quick Kutz had one - thanks ebay :-)
Do you like the metallic, aged embossed look of the badge ? Stampendous aged copper embossing enamel - how gorgeous is that ! I also embossed around the edge of the central image.
The multi horse thing thats going on there is an idea I saw on the WMS website - I loved it so had to case it. It is so easy to do. I used the same colour ink each time. For the first horse on the left I inked up the horse stamp and stamped it on scrap paper twice, then onto my card front. The middle horse was inked up and stamped off once onto scrap. The final and darker horse was inked and stamped straight onto the card. Cool or what eh.
My favourite things about this card is how well the background native blanket image stamped - LOVE that. The other thing I really like is the boots, stamped in Stampin' Up!s raspberry ripple and then UTEE'd. The little pearls just add a bit of interest and dimension.
Sunday, November 4, 2012
September ATC's
The Septembers title was to produce something for a given decade, 1940's, 50's, 60's and 70's.
I was allocated the 70's, such a great musical decade - thank heavens for Saturday Night Fever and John Travolta :-) The front is a collage of 70's images, with a central rotating disco ball.
I always decorate the back of an ATC, I figure if I spend so much time on the front, I should at least spend a little time on the back. In this instance, on the back of my disco ball is a record - remember those ? lol A cd or digital file really would not have given the same effect.Wednesday, October 31, 2012
Heat embossing 101
After having a conversation with someone today regarding heat embossing, I thought I would briefly set out the available options for this wonderful technique. I remember when I first started crafting and the heat tool was the first thing I bought - wish I'd known these options all those years ago.
1. Versamark with clear embossing powder on a colored cardstock - means you will see through the glossy embossing to the colored cardstock. Gives a nice crisp and raised stamped image.
2. Versamark and colored embossing powder. You can use any color of cardstock and the colored embossed image will clearly show. Gives a nice crisp and raised stamped image.
3. Colored versamark and clear embossing powder. The image will be the color of the versamark. Gives a nice crisp and raised stamped image.
4. Colored versamark and colored embossing powder. Whatever type of versamark you use (clear or colored) the colored embossing power will be what determines the color of the finished embossed image. Gives a nice crisp and raised image.
5. Craft ink is basically a versamark with color. See above applications.
6. Versamark and ink with clear embossing powder. Apply versamark to image, then stamp the versamark inked image into the color of ink of your choice and stamp onto cardstock. Then emboss with clear embossing powder. The stamped image will be the color of the ink you used. Gives a sharp stamped image but not quite as raised as the versamark is under a layer of ink. The stamp must be cleaned inbetween each stamping unless you will put colored ink into your versamark.
7. Any ink will work for the heat embossing technique, it does not have to be versamark/craft but you must apply the embossing powder instantly as the ink dries quicker than versamark or craft ink. If stamping on a non-porous surface you have more time as the ink will not try as quickly. The new SU stamp pads are much wetter and will work for this technique better than the previous stamp pads.
Phew, I think that covers the major aspects of heat embossing.
If you arent sure about something - just try it. You might discover a new way of doing things :-)
1. Versamark with clear embossing powder on a colored cardstock - means you will see through the glossy embossing to the colored cardstock. Gives a nice crisp and raised stamped image.
2. Versamark and colored embossing powder. You can use any color of cardstock and the colored embossed image will clearly show. Gives a nice crisp and raised stamped image.
3. Colored versamark and clear embossing powder. The image will be the color of the versamark. Gives a nice crisp and raised stamped image.
4. Colored versamark and colored embossing powder. Whatever type of versamark you use (clear or colored) the colored embossing power will be what determines the color of the finished embossed image. Gives a nice crisp and raised image.
5. Craft ink is basically a versamark with color. See above applications.
6. Versamark and ink with clear embossing powder. Apply versamark to image, then stamp the versamark inked image into the color of ink of your choice and stamp onto cardstock. Then emboss with clear embossing powder. The stamped image will be the color of the ink you used. Gives a sharp stamped image but not quite as raised as the versamark is under a layer of ink. The stamp must be cleaned inbetween each stamping unless you will put colored ink into your versamark.
7. Any ink will work for the heat embossing technique, it does not have to be versamark/craft but you must apply the embossing powder instantly as the ink dries quicker than versamark or craft ink. If stamping on a non-porous surface you have more time as the ink will not try as quickly. The new SU stamp pads are much wetter and will work for this technique better than the previous stamp pads.
Phew, I think that covers the major aspects of heat embossing.
If you arent sure about something - just try it. You might discover a new way of doing things :-)
Monday, October 15, 2012
October crafting group
My craft groups got together this week and I think this card has to be amongst the best ever received, everyone really enjoyed making it. The card itself if quite unique in its folding, for more info about how to do it, go to the demo by talented SU demonstrator KellyJean Gettelfinger in the following video :
http://www.youtube.com/watch?v=qhMJl_Mh8FY&feature=plcp
But what was also nice was the gingerbread men from the Scentsational Season stamp set embossed in sugar and spice embossing powder, they were almost good enough to eat. The detail on the gingerbread men is picked out by using a white gel pen.
SU ingredients :
Stampset : Scentsational Season, sentiment
Cardstock : Whisper white, crumb cake, soft suede and various dsp. Everybody had a different dsp :)
Accessories : Scented embossing powder, gel pen, Holiday collection framelits dies
The second card was a more traditional Christmas card, using the kissing technique. Maybe I should have included a little bit of mistletoe on there ! lol The deer from the stamp set Christmas Deer is a perfect type of solid image to use for this technique.
SU ingredients :
Stampset : Christmas Deer, En Francais background stamp, Priority Mail (Hostess set)
Cardstock : Gumball green, crumb cake, naturals white, Festival of Prints dsp
Accessories : Bakers twine, Labels collection framelits
http://www.youtube.com/watch?v=qhMJl_Mh8FY&feature=plcp
But what was also nice was the gingerbread men from the Scentsational Season stamp set embossed in sugar and spice embossing powder, they were almost good enough to eat. The detail on the gingerbread men is picked out by using a white gel pen.
SU ingredients :
Stampset : Scentsational Season, sentiment
Cardstock : Whisper white, crumb cake, soft suede and various dsp. Everybody had a different dsp :)
Accessories : Scented embossing powder, gel pen, Holiday collection framelits dies
The second card was a more traditional Christmas card, using the kissing technique. Maybe I should have included a little bit of mistletoe on there ! lol The deer from the stamp set Christmas Deer is a perfect type of solid image to use for this technique.
SU ingredients :
Stampset : Christmas Deer, En Francais background stamp, Priority Mail (Hostess set)
Cardstock : Gumball green, crumb cake, naturals white, Festival of Prints dsp
Accessories : Bakers twine, Labels collection framelits
Sunday, October 14, 2012
Casing a card from SU catalogue
There is an adorable card in the Stampin' Up! catalogue. For a friends wedding recently I cased the card. Love the shiny hearts.
Thanks
A friend recently gave us a delicious box of Honey Crisp Apples fresh from her tree - yummy. They are our absolute favorite. I made a very appropriate apple thank you card.
The apple is made from punching multiple hearts, folding them in half, gluing them together and sponging. I snip off the bottom of the heart to give it that apple shape. Its better to use thinner paper for the apple unless it gets too bulky. Love 3d cards :-)
Sunday, September 23, 2012
September Craft Group
I realise I havent posted anything for a little while, naughty of me ! Its so easy to get caught up in day-to-day life. I find suddenly though that I have a little time.
I am excited to start my monthly craft groups again, our first get together was last week and was really great. I enjoy it as much as everyone who comes - 100% job satisfaction :)
We did two projects this month :
The first using the new Etruscan Elegance Jumbo Stampin' Around wheel in the holiday mini catalogue. Its such a stunning image, particularly on a monochromatic card like this. I used midnight muse and white, and a sentiment from the My Friend stamp set - which co-ordinates beautifully.
A touch of bling to this one too, just a little gem to sparkle and reinforce the friend sentiment :-)
Tips to rolling straight : I turn the cardstock so I am rolling forward/up. I stand over the image and roll forward/upwards keeping track of the right side of the cardstock to stay straight.
Tips for a complete image on your cardstock : Start off the cardtock and aim to finish a few inches above. Apply equal pressure all the way. Oh and best do some practicing on scrap paper first - its all about confidence :)
SU recipe :
Stamps : Etruscan Elegance wheel, My Friend stampset
Cardstock : Whisper white, Midnight Muse
Accessories : Midnight Muse 3/8" stitched satin ribbon, rhinestone basic jewel
Technique : Wheel and stamping
The second project, another blue card (very unusual for me), is using the new Blooming with Kindness stamp set. A flower image with a number of great sentiments. I love the swirly writing - its very sophisticated. The whole flower image was stamped in pool party ink, then we used the island indigo marker to color in a few petals of the flower. So simple and so effective. This technique is much better now that SU have changed the stamp pads. The new pads are much wetter and inkier.
Credit for this card goes to Darlene Donahue, we made this card at the downline meeting and I thought it would be a great one for my group, it was perfect for both the seasoned and new crafters.
SU recipe :
Stamps : Blooming with Kindness
Cardstock : Very vanilla, pool party, island indigo, comfort cafe dsp.
Accessories : Stampin dimensionals
I am excited to start my monthly craft groups again, our first get together was last week and was really great. I enjoy it as much as everyone who comes - 100% job satisfaction :)
We did two projects this month :
The first using the new Etruscan Elegance Jumbo Stampin' Around wheel in the holiday mini catalogue. Its such a stunning image, particularly on a monochromatic card like this. I used midnight muse and white, and a sentiment from the My Friend stamp set - which co-ordinates beautifully.
A touch of bling to this one too, just a little gem to sparkle and reinforce the friend sentiment :-)
Tips to rolling straight : I turn the cardstock so I am rolling forward/up. I stand over the image and roll forward/upwards keeping track of the right side of the cardstock to stay straight.
Tips for a complete image on your cardstock : Start off the cardtock and aim to finish a few inches above. Apply equal pressure all the way. Oh and best do some practicing on scrap paper first - its all about confidence :)
SU recipe :
Stamps : Etruscan Elegance wheel, My Friend stampset
Cardstock : Whisper white, Midnight Muse
Accessories : Midnight Muse 3/8" stitched satin ribbon, rhinestone basic jewel
Technique : Wheel and stamping
The second project, another blue card (very unusual for me), is using the new Blooming with Kindness stamp set. A flower image with a number of great sentiments. I love the swirly writing - its very sophisticated. The whole flower image was stamped in pool party ink, then we used the island indigo marker to color in a few petals of the flower. So simple and so effective. This technique is much better now that SU have changed the stamp pads. The new pads are much wetter and inkier.
Credit for this card goes to Darlene Donahue, we made this card at the downline meeting and I thought it would be a great one for my group, it was perfect for both the seasoned and new crafters.
SU recipe :
Stamps : Blooming with Kindness
Cardstock : Very vanilla, pool party, island indigo, comfort cafe dsp.
Accessories : Stampin dimensionals
Thursday, August 23, 2012
Casing inspiration
How wonderful and priviledged I feel to be a member of this vast and international group of talented crafters. I love Kates blog. She recently cased a card I had done and gave me credit. Its great to take inspiration from someone elses work, and so thrilling for the crafter who did the work originally. Thanks Kate and take note everyone else to give credit where its due.
http://katescardcorner.blogspot.ca/2012/08/home-sweet-home.html
Thursday, June 28, 2012
Its ATC time
My ATC group met today, the theme being "I ....., therefore I ....". I liked this because it can mean something different to everyone, there is no one obvious response, other than the original from Descartes, "I think, therefore I am". I hope the girls wont mind me posting their beautiful artwork, I wanted to show how varied the thinking and therefore the creations were. I love being part of this group and I thoroughly enjoy doing ATC's. Its a mini work of art and you dont have to put a sentiment on it ! lol
Captain America
Having all male children, its that challenge of boys birthday cards ! I cased this card from Alison Ohran, a talented SU demonstrator. I love the real red with the pacific point - so striking.
Saturday, June 23, 2012
Teacher Thank you's
OK, so the last couple of teacher thank you's are done.
This one is for my school librarians, they are so supportive and encouraging to childhood literacy. They make each child feel special. The library is organised into 4 categories, the name of each I put onto each book - how perfect is that :-) I got the inspiration for this card from the Stampers Connection, the Stampin' Up! demonstrators website. So many GREAT ideas there.
The second card is for the school administrative staff, principal and vice principal. Its been a challenging year with the teachers action, so I felt they deserved a thank you. I love this 3d apple, which is the large heart punch, scored and glued together.
This one is for my school librarians, they are so supportive and encouraging to childhood literacy. They make each child feel special. The library is organised into 4 categories, the name of each I put onto each book - how perfect is that :-) I got the inspiration for this card from the Stampers Connection, the Stampin' Up! demonstrators website. So many GREAT ideas there.
The second card is for the school administrative staff, principal and vice principal. Its been a challenging year with the teachers action, so I felt they deserved a thank you. I love this 3d apple, which is the large heart punch, scored and glued together.
Open House
I hosted a couple of Open Houses to launch the new 2012-13 Stampin' Up! catalogue. The catalogue is crammed full of lovely items, stamp sets, embellishments, ribbon, dies, papers, punches etc, etc. I think the two most exciting things for me are : the new stamp pads and the new in-colours. So much inspiration, so many cards to make ..... lol
Here is the make or take card all the attendees made, simple and yet so effective :
SU recipe :
Stamp set : Word Play
Ink : Chocolate chip
Cardstock : white, floral district dsp
Accessories : Blossom punch, 3/4 inch circle punch, perfect polka dot embossing folder, big shot
Here is the make or take card all the attendees made, simple and yet so effective :
SU recipe :
Stamp set : Word Play
Ink : Chocolate chip
Cardstock : white, floral district dsp
Accessories : Blossom punch, 3/4 inch circle punch, perfect polka dot embossing folder, big shot
Sunday, June 17, 2012
June WMS blog hop - Inspire Me
Amidst the chaos of the day to day ... I found the time to take part in the WMS blog hop.
The instructions were simple, to take inspiration from this photo and to use Waltzing Mouse Stamps. I loved the idea of taking inspiration from a picture and the first thing that came to mind was : wainscoting.
![[June%2520Blog%2520Party%255B9%255D.jpg]](https://lh3.ggpht.com/-i3lgaV7xl9Q/T8gOupwQxuI/AAAAAAAAOf0/xFmHAuLtl14/s320/June%252520Blog%252520Party%25255B9%25255D.jpg)
My wainscoting is all delicately scored and sponged so that it would show in the photo.
The instructions were simple, to take inspiration from this photo and to use Waltzing Mouse Stamps. I loved the idea of taking inspiration from a picture and the first thing that came to mind was : wainscoting.
![[June%2520Blog%2520Party%255B9%255D.jpg]](https://lh3.ggpht.com/-i3lgaV7xl9Q/T8gOupwQxuI/AAAAAAAAOf0/xFmHAuLtl14/s320/June%252520Blog%252520Party%25255B9%25255D.jpg)
My wainscoting is all delicately scored and sponged so that it would show in the photo.
A close up of the newest addition to my stash : Stampendous aged ivory embossing enamel. Shown here, but more clearly on the hinge clip below. It is ivory with golden flecks - when heated they melt to give that aged look. I have to say it is absolutely fabulous and worked so well with my WMS stamps :-)
Its great to play along in the blog hop - thanks for looking.
Supplies used : Marina Mist, Not quite navy and whisper white cardstock - Stampin' Up!, soft stone cardstock pti, Prima flowers, Lustre crystals, Stampendous aged ivory embossing enamel, Paris Nouveau Stamp set, Labels 25 die
Wednesday, June 6, 2012
Rock 'n' roll technique
Love this technique, its so effective on so may images, but especially nature ones, trees, flowers etc. This is my newest purchase from Waltzing Mouse Stamps. LOVE LOVE LOVE it ! I made this for a friend who has just moved house. My favourite colors appear again - orange and green - just cant get enough of them :-)
You may also notice the kissing technique on the tree trunk. I inked up the solid tree trunk in chocolate chip ink, inked my wood grain stamp in a lighter color and touched them together before stamping the trunk.
Thanks for looking x
You may also notice the kissing technique on the tree trunk. I inked up the solid tree trunk in chocolate chip ink, inked my wood grain stamp in a lighter color and touched them together before stamping the trunk.
Thanks for looking x
Sunday, June 3, 2012
S W I N G
Yet another swing card - I'm gonna be a pro at this, thats two I've done now ! lol I love the finished article but the cutting and scoring is torturous ! Next time I will try to use my big shot and a die to do it.
I used the SU set 'Lovely as a tree', very vanilla and night of navy card stock, crumb cake seam binding and chocolate chip ink. The sentiment is from Waltzing Mouse Stamps, and the patterned paper is Basic Grey Little Black Dress.
Thanks for looking and please come again :-)
I used the SU set 'Lovely as a tree', very vanilla and night of navy card stock, crumb cake seam binding and chocolate chip ink. The sentiment is from Waltzing Mouse Stamps, and the patterned paper is Basic Grey Little Black Dress.
Thanks for looking and please come again :-)
Coloring with my SU markers
Coloring with my SU markers is not a thing I have done much of. I own the boxed set of markers (lucky me :-) but I havent really used them very much. I got the inspiration from watching a video on the Stampers Connection by Karen Barber.
SU recipe :
Stamp Set : Simply Soft, Itty Bitty Banners
Cardstock : Whisper white, pacific point
Makers : Bashful blue, marina mist, pacific point, wild wasabi, garden green, white gell pen
Accessories : ticket corner punch
Technique : Coloring, punching
SU recipe :
Stamp Set : Simply Soft, Itty Bitty Banners
Cardstock : Whisper white, pacific point
Makers : Bashful blue, marina mist, pacific point, wild wasabi, garden green, white gell pen
Accessories : ticket corner punch
Technique : Coloring, punching
Sympathy card
My first ever sympathy card !!!
Cards are for all occasions, not just the happy ones. Its touching to receive a hand made card at such a time.
The stamp set is from Just Rite Stamps, With Sympathy. The flowers are colored with copics, few dabs of white gel pen and cut out - yes it took quite a while, but I love how the roses sit on top of the frame and embossed cardstock.
Cards are for all occasions, not just the happy ones. Its touching to receive a hand made card at such a time.
The stamp set is from Just Rite Stamps, With Sympathy. The flowers are colored with copics, few dabs of white gel pen and cut out - yes it took quite a while, but I love how the roses sit on top of the frame and embossed cardstock.
Its Vivienne AGAIN !
Love this stamp from Kraftin' Kimmie Stamps, she is a pleasure to colour with my copics and paperpiece :-) I came across this piece of reflective card amongst my craft supplies, and framed by the Spellbinders Fleur de Lis Square it made quite the ornate mirror. I would imagine Vivienne takes frequent glances at herself. lol
The last craft class
Gosh, I can hardly believe that 9 months has passed - could have grown another human being in that time, and in fact two of the group did ! Welcome Sophie and Marcus :-) The rest of us just managed a bit of crafting !!! lol
For the last class we made a male orientated card, suitable for Birthday or Fathers Day and there were a selection of sentiments available to the crafters.
The vanilla craft ink has been retired from the SU catalogue now, which is a shame. I loved embossing with it onto dark cardstock.
SU recipe :
Stamp set : Sincere Salutations, Natures Nest
Cardstock : Night of Navy, Very Vanilla
Ink : Vanilla craft ink, concord crush, sahara sand
Accessories : Scallop ribbon punch, large oval punch, corner rounder, clear embossing powder
Techniques : Stamping, punching, heat embossing
At the last class we also did some 'thinking on your feet'. I wanted the crafters to use their own supplies and imaginations. We did an Artist Trading Card Challenge. Everybody made two identical-ish trading cards, the title being 'Beauty' and then traded one. I thought it was a huge success and I loved seeing all of the individual and personal works of art that were produced.
If you dont know what Artist Trading Cards's are, here is a brief summary :
For the last class we made a male orientated card, suitable for Birthday or Fathers Day and there were a selection of sentiments available to the crafters.
The vanilla craft ink has been retired from the SU catalogue now, which is a shame. I loved embossing with it onto dark cardstock.
SU recipe :
Stamp set : Sincere Salutations, Natures Nest
Cardstock : Night of Navy, Very Vanilla
Ink : Vanilla craft ink, concord crush, sahara sand
Accessories : Scallop ribbon punch, large oval punch, corner rounder, clear embossing powder
Techniques : Stamping, punching, heat embossing
At the last class we also did some 'thinking on your feet'. I wanted the crafters to use their own supplies and imaginations. We did an Artist Trading Card Challenge. Everybody made two identical-ish trading cards, the title being 'Beauty' and then traded one. I thought it was a huge success and I loved seeing all of the individual and personal works of art that were produced.
If you dont know what Artist Trading Cards's are, here is a brief summary :
Artist Trading Cards (ATC's)
Is a 2.5 x 3.5 pocket size canvas.
Originally designed to be an artists calling card, created in 16th
century Europe. They were considered the first pocket sized photo's
– rich men often commissioned artists to do nude ATC's of their
mistresses ! Also used during match making. Later used for
advertising and for artists to study each others style.
They have gained momentum since 1997,
when baseball and other sports cards were standardised, and were
traded. A Swiss artist, Stirnemann, created and show cased 1,200
similarly sized cards, he told people who wanted one of his cards to
come back and bring one of their own to trade.
Stirnemanns work spread through Canada
through Calgary artist Don Mabie (aka Chuck Stake) who participated
in the 1997 trade. In 2000 the two collaborated on an exhibition in
Calgary, with 80 artists from 10 different countries. The concept
spread across the globe like wildfire.
What is fun about ATC's :
You dont sell them, you cant buy them,
you can only trade them.
Design, make and trade these tiny
treasurers, using your imagination and all your craft supplies.
Join or start an ATC group, choose a
title for each exchange.
Paper piecing a sofa !
What a lovely way to spend a few hours than stamping and paper piecing images..... ahhhh. This and my beloved copics must be my favourite crafty past time. I find it so relaxing and therapeutic. I find myself totally absorbed and the time just flies by.
I spent so long on the sofas, then when I had them I didn't know what to do with them ! lol Cards turned out ok, but not quite as I had planned.
Love the Clear & Simple Stamps set House Notes II and the Basic Grey Picadilly paper pad had papers in just the right scale for a sofa.
Thanks for looking :-)
I spent so long on the sofas, then when I had them I didn't know what to do with them ! lol Cards turned out ok, but not quite as I had planned.
Love the Clear & Simple Stamps set House Notes II and the Basic Grey Picadilly paper pad had papers in just the right scale for a sofa.
Thanks for looking :-)
Subscribe to:
Posts (Atom)