
Saturday, February 23, 2013
Happy 2nd Birthday
A friends son just turned 2. I just adore this stamp set from Pink Cat Studio. I coloured him with my copics, put mica flakes on for his hood. I hope they liked it :-)


February group cards
At my stampers group this month the focus was definitely on valentines and love. We did two cards :
 This is actually the first shaker card I have ever made and I loved it.
SU ingredients :
Stamp set : Perfectly preserved, Seasonal Sayings
Cardstock : Read red, whisper white
Accessories : window sheets, pool party bakers twine, small heart punch, cannery set framelits
 For this heart, we made a stencil and sponged through with primrose petals using a sponge dauber. It gives a lovely suede effect. The edges of the layers are distressed using the SU distressing tool. I used the honeycomb embossing with the core'dinations cardstock and sanded it. Thanks to Brandy Stamps for the inspiration.
SU ingredients :
Stamp set : itty bitty banners,
Cardstock : Primrose petals core'dinations cardstock, whisper white
Accessories : Honeycomb embossing folder, sanding block, distressing edger, heart punch

SU ingredients :
Stamp set : Perfectly preserved, Seasonal Sayings
Cardstock : Read red, whisper white
Accessories : window sheets, pool party bakers twine, small heart punch, cannery set framelits

SU ingredients :
Stamp set : itty bitty banners,
Cardstock : Primrose petals core'dinations cardstock, whisper white
Accessories : Honeycomb embossing folder, sanding block, distressing edger, heart punch
Moms and daughters card class
I did a Moms and daughters class, It was fun and they all enjoyed it A LOT ! One of the cards we did was for either a teachers valentine, or to be saved for end of year thank you.
 I love the SU owl, isn't s/he just adorable. We did fancy dsp on the chest - to mimic a teachers dress - at least thats how teachers dressed in my day ! lol The books were made using the word window punch. The black board is written on with a graphite pencil and then the white graphite is rubbed with a paper pencil - available at all good art stores. The 4U is a retired SU stamp. I dont like to use retired stuff in a class really, but it was just so perfect. Thanks for visiting.

Monday, January 28, 2013
January ATC's - Punch Art
I LOVE punch art, its so satisfying to make things out of punched shapes. Am I reverting to my childhood ? lol I think so, I love to cut, punch and color.
Its good to see that my frog fetish is still alive and well ! lol Everything was stamped or embossed, cut/punched and then adhered. His tongue is long and curly. LOVE him xxx
 The other punch art creations :

Its good to see that my frog fetish is still alive and well ! lol Everything was stamped or embossed, cut/punched and then adhered. His tongue is long and curly. LOVE him xxx


January SU party
I dont do a lot of SU parties, but during Sale-a-bration they seem to get more popular. I did a party recently and just loved the cards we made :
 The Papillion Potpourri stamp set and co-ordinating punch is just fantastic. I colored the rhinestones with sharpie markers to match the butterfly colors and the sentiment is from the Blooming with Kindness stamp set.
 I made another of the triple time stamping cards, using Elements of Style. I stamped the humming bird in pink, brave burgundy for the flowers and then used a blender pen to do a little coloring. The blender pens are so fantastic and easy to use. The embelishment is distressed circles adhered with a brad. The sentiment 'Life in a matter of moments' is just perfect.
Thanks for looking, and have a great day x


Thanks for looking, and have a great day x
December ATC - The 12 Days of Christmas
The challenge was to each choose one of the 12-days of Christmas and make our ATC's for that theme. I chose, 3 french hens. I feel a little superstitious about the number 3. The back ground collage is made with kitchen roll and luminere paints. I had so much fun doing that.


The full set of December ATC's : 3 french hens, 4 calling birds, 5 gold rings and 9 ladies dancing. They are all so different - I really enjoyed this festive ATC exchange.

Saturday, January 19, 2013
Are the walls closing in in my craft room ?
I am sure that the walls are closing in in my craft room ! It seems to get smaller and smaller. I'm having trouble find a home for my purchases ! lol So tonight I incorporated some new storage - ok, its white so doesn't really match, but we had it and it was free so who cares ! My stamp sets are now sorted into categories and on the new shelves, my embelishments are sorted and in the glass fronted cabinet, as are all my 'coloring' things ! (Embossing powder, glitter, markers, copics etc, etc). I am super excited and thought I'd better take a few pics whilst its tidy !


Bookmarks
I am an avid reader, in two book clubs and active on the Good Reads website - if you like to read and havent been there yet - I highly recommend it. Bookmarks, therefore seem to be an appropriate thing for me to make. This is made with the PTI bookmark die and a Tim Holtz Visual Artistry stamp set, Flights of Fancy. What a fabulous sentiment.
You may think you are seeing double, but I shadow stamped the flowers to give it depth and it also co-ordinated better with the letters, which are kind of shadowed.
 The cardstock, ribbon and ink are Stampin' Up! raspberry ripple and wild wasabi.
Thanks for looking x
You may think you are seeing double, but I shadow stamped the flowers to give it depth and it also co-ordinated better with the letters, which are kind of shadowed.

Thanks for looking x
Interference Perfect Pearls
I love perfect pearls, but recently came across interference perfect pearls. WOW ! It basically works the opposite way to perfect pearls. You apply the powder to the dark cardstock and stamp with your versamark/perfect medium inked up stamp. The versamark removes the perfect pearls, leaving a beautiful image. Set it with a light spritz of H20.
 This card is created for my best friend Katrina for Valentines, sending love across the miles to her xxx
I also used the MFT cloud dies and a retired love stamp set. I made the heart from sculpey clay - a new hobby ! Another one - Oh my !!!! lol
Thanks for looking x

I also used the MFT cloud dies and a retired love stamp set. I made the heart from sculpey clay - a new hobby ! Another one - Oh my !!!! lol
Thanks for looking x
Friday, January 18, 2013
WMS January 2013 Blog Party

This month's WMS blog party has the LOVE theme ! I decided to make a card for my son. He is about to turn 11 and a really fantastic kid, I am so proud of him. As soon as I saw the little hero additions stamp set, I knew I just had to have it. I love the sentiments and will use them often to express myself to my boys xxx
( I am taking the photos at night so I dont miss the submission deadline - bit disappointed in the color in the photo, it is so much more vibrant in real life / day light. )

I coloured the boy in copics highlighting with a little prismacolor white and gel pen, paper pieced the teddy, used various Spellbinders sets - banners, majestic elements resplendent rectangles and can you see the heart peeping out from behind the boy. The small hearts in the blue heart and punched using a Creative Memories confetti heart punch. The gorgeous background paper is from a 6x6 paperpack by Crate Paper - Toy Box Collection.
Do you see the red heart ? The heart is my new found hobby - Sculpey clay. It is really easy to work with and is available in a large variety of colours and metallics. When baked it is very hard and light weight - kinda the perfect medium for making your own embellishments. Close up :

Thanks for looking. I am off to look at all the other wonderful creations on the WMS blog.
Just for comparison, I took another photo this morning, with natural light :-)

January SU parties
I dont use flowers really, so I decided that pinwheels are my new flowers :) Stampin' Up! has a new pinwheel die in the spring catalogue. During the workshop I wanted to demo using the die and also making your own. The smaller one is with the die, the larger one is hand cut - super easy.


SU recipe :
Stamp set : Bitty banners
Ink : Midnight Muse
Cardstock : Print Poetry dsp, Whisper white and naturals white
Embellishments : Glimmer brad, pool party bakers twine, mini silver brads
Tools : Pinwheel die, Clear oval accent bigz die, Chevron embossing folder
The second card was a design I have been looking forward to doing, triple time stamping. It is easy and very effective. Some people used this flower stamp from elements of style, whilst others made a male card - yes, its true, a card for a man !!! lol We used The Open Sea stamp set for that and I hope the recipients are appreciative !

SU recipe :
Stamp set : Elements of Style
Ink : Bravo burgundy
Cardstock : Very vanilla, bravo burgundy
Embellisments : Brights button, linen twine
Thursday, January 3, 2013
Last WMS Sketch Challenge #129
Oh no ..... its the last sketch challenge from Waltzing Mouse Stamps !
Even though I don't often get to 'play', I love the creative inspiration from the samples in these challenges. I will really miss it, my Saturday mornings just wont be the same.
So, obviously I just had to create something for the last challenge, #129. Thank you Claire for running this challenge for so long, and I look forward to what you do next.
I made a card for him and also a challenge entry.

I took inspiration from the Generation Tech DCWV paper stack I recently bought, specifically the pacman sheet. This is my pacman, just made more fabulous. The pacman is made using my WMS Doily Stamps, the sentiments are from Free Spirit Sentiments and the banners are Bitty Banners.
Thanks for looking and Happy New Year x
Even though I don't often get to 'play', I love the creative inspiration from the samples in these challenges. I will really miss it, my Saturday mornings just wont be the same.
So, obviously I just had to create something for the last challenge, #129. Thank you Claire for running this challenge for so long, and I look forward to what you do next.
I made a card for him and also a challenge entry.

I took inspiration from the Generation Tech DCWV paper stack I recently bought, specifically the pacman sheet. This is my pacman, just made more fabulous. The pacman is made using my WMS Doily Stamps, the sentiments are from Free Spirit Sentiments and the banners are Bitty Banners.
Thanks for looking and Happy New Year x
Monday, December 17, 2012
Christmas lights
I found a new use for my blossoms punch. Its a great way to use up all those colored scraps.

Reverse kissing technique

The grass is stamped with versamark and then colored with silver perfect pearls.
Decembers SU parties
Having made 4 Christmas cards in class this year, yes you hear me correctly - 4 ! lol I am known for not embracing the whole Xmas card making thing, but have to appreciate that other people do like it !
So Decembers projects were not winter related at all.
First there was the box, with candy inside. Couple of things about the flower included the sewing we did to secure everything together and the ribbon rosette we made. The cardstock was die cut into the flower shaped and then crumpled into a ball and rubbed. This made the fibres split and we were able to separate the front from the back of the cardstock. I love how it looks, thin, ragged petals.

SU recipe :
Stamp set : Word play
Cardstock : Cherry cobbler, baja breeze
Accessories : Fun Flower Die, Fancy favor box, vintage faceted button, organza ribbon.
The second project was using the technique called Josephs Technicolor coat, or something similar ? I fell in love with this technique when I first saw it and it always amazes me when I do it as the end result is always different and original. To to the technique you sponge the background cardstock, then stamp images with versamark and clear emboss it. Then sponge with a darker color, early espresso in this instance. As you sponge and the pattern materialises, where the embossing powder resists the espresso ink, its like magic.

SU recipe :
Stamp set : French foliage
Cardstock : Very vanilla, early espresso, summer starfruit
Ink : Early espresso, certain celery, summer starfruit, pumpkin pie and bravo burgundy
Assessories : Top note die, Woodgrain embossing folder, ribbon slide, summer starfruit ribbon
So Decembers projects were not winter related at all.
First there was the box, with candy inside. Couple of things about the flower included the sewing we did to secure everything together and the ribbon rosette we made. The cardstock was die cut into the flower shaped and then crumpled into a ball and rubbed. This made the fibres split and we were able to separate the front from the back of the cardstock. I love how it looks, thin, ragged petals.

SU recipe :
Stamp set : Word play
Cardstock : Cherry cobbler, baja breeze
Accessories : Fun Flower Die, Fancy favor box, vintage faceted button, organza ribbon.
The second project was using the technique called Josephs Technicolor coat, or something similar ? I fell in love with this technique when I first saw it and it always amazes me when I do it as the end result is always different and original. To to the technique you sponge the background cardstock, then stamp images with versamark and clear emboss it. Then sponge with a darker color, early espresso in this instance. As you sponge and the pattern materialises, where the embossing powder resists the espresso ink, its like magic.

SU recipe :
Stamp set : French foliage
Cardstock : Very vanilla, early espresso, summer starfruit
Ink : Early espresso, certain celery, summer starfruit, pumpkin pie and bravo burgundy
Assessories : Top note die, Woodgrain embossing folder, ribbon slide, summer starfruit ribbon
Flower order fulfilled !
Someone asked me to make 6 flower cards from their Xmas gift. I do love the Fun Flowers die so was happy to oblige :-) My time was limited and I definitely prefer some to others, but sure they will love them.


Santas Candy Elves


SU demonstrators XMas party

Friday, November 23, 2012
Novembers SU get togethers
A Christmas themed month again - unusual for me, especially as I dont personally make any Christmas cards ! Wierd for a devout card maker.
The first card was a glitter demo.
I cased this magical little snowman from talented SU demonstrator Annette John - thanks Annette for the inspiration.
The glitter on the embossed snowflakes is SU dazzling diamonds, adhered with a little two-way glue. The strip across the bottom is double sided tape. It is very easy to apply this tape in a straight line and get such a straight glittered ground.
I printed a 'let it snow' sentiment and some people punched them out and added them to the card front.
 SU recipe :
Cardstock : Baja breeze, whisper white, pumpkin pie
Tools : 1.75 and 1.25 circle punch, Northern Flurry embossing folder
Embellisments : Dazzling diamonds, midnight muse stitched ribbon, marker to draw in arms and mouth

The second card was all about using the negative image.
Last month we die cut little gingerbread men, but this month we are working the negative image that a die cut leaves, using the candy cane die.
The how to : I die cut the candy cane in the crumb cake (kraft) cardstock, put it in place on the white and drew a faint pencil outline of the candy cane. I then knew where to put my big glue dot, to cover the pencil outline. Short pieces of ribbon were then cut and adhered to the big glue dot. The Christmas sentiment and faux stitching were done before the crumb cake (kraft) cardstock was pop dotted into place, and the bow added with a small glue dot.
It seems complicated, but really isn't.
Here is a video by SU demonstrator Dawn Olchefske : http://www.youtube.com/watch?v=Kkznt9WB-Eg&list=UUE2h52pY7ELbAENtDm7MbxA&index=20&feature=plcp
We also made a co-ordinating gift tag :

Su recipe :
Stamps : single Christmas stamp from Seasonal Saying stamp set using raspberry ripple ink
Cardstock : Raspberry ripple and crumb cake (kraft)
Embellisments : Raspberry ripple and white ribbon, piercing mat and essentials paper piercing pack, white gel pen, jumbo sticky rounds (aka big glue dot)
The first card was a glitter demo.
I cased this magical little snowman from talented SU demonstrator Annette John - thanks Annette for the inspiration.
The glitter on the embossed snowflakes is SU dazzling diamonds, adhered with a little two-way glue. The strip across the bottom is double sided tape. It is very easy to apply this tape in a straight line and get such a straight glittered ground.
I printed a 'let it snow' sentiment and some people punched them out and added them to the card front.

Cardstock : Baja breeze, whisper white, pumpkin pie
Tools : 1.75 and 1.25 circle punch, Northern Flurry embossing folder
Embellisments : Dazzling diamonds, midnight muse stitched ribbon, marker to draw in arms and mouth

The second card was all about using the negative image.
Last month we die cut little gingerbread men, but this month we are working the negative image that a die cut leaves, using the candy cane die.
The how to : I die cut the candy cane in the crumb cake (kraft) cardstock, put it in place on the white and drew a faint pencil outline of the candy cane. I then knew where to put my big glue dot, to cover the pencil outline. Short pieces of ribbon were then cut and adhered to the big glue dot. The Christmas sentiment and faux stitching were done before the crumb cake (kraft) cardstock was pop dotted into place, and the bow added with a small glue dot.
It seems complicated, but really isn't.
Here is a video by SU demonstrator Dawn Olchefske : http://www.youtube.com/watch?v=Kkznt9WB-Eg&list=UUE2h52pY7ELbAENtDm7MbxA&index=20&feature=plcp
We also made a co-ordinating gift tag :

Su recipe :
Stamps : single Christmas stamp from Seasonal Saying stamp set using raspberry ripple ink
Cardstock : Raspberry ripple and crumb cake (kraft)
Embellisments : Raspberry ripple and white ribbon, piercing mat and essentials paper piercing pack, white gel pen, jumbo sticky rounds (aka big glue dot)
November 2012 ATCs - Friends Matter
This months topic was 'Friends Matter'. I loved how different everybodies were this month.
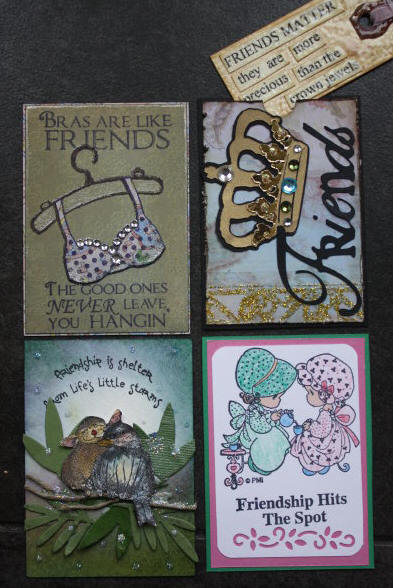
I used a piece of Stampington and Co paper, sponged with a variety of distress inks. I stamped the sentiments in SU concord crush ink, then stamped and heat embossed the bra and hanger, paperpiecing the bra with some random patterned paper I found in my paper drawer. Do you like the glittery detail on the bra, edging and on the hanger ? It is done with a Sakura clear gelly roll pen. A few jewels add the bling.


Frog fetish continues ....

Art Impressions Stamps

I love this lady dancing, and coupled with the paper pieced dress and ribbon background, its perfect.
I didn't have a suitable sentiment so I typed one out on my pc and printed it, accompanied by a nice glimmer brad.
Soccer Star

Recipe :
SU retured background stamp and ball
Spellbinders stars
MFT grass die cut
Christmas Birdhouses
I saw this image stamped and colored and just knew I HAD to have this stamp !
It is made by Northwoods Rubber Stamps, and is a deeply etched rubber stamp on a wood block. So easy to ink, so easy and beautiful to stamp with.
 I spent a lovely few hours coloring one night, and it is finally official ! I can not longer just sit and watch tv, coloring with my fantastic copic markers makes it so much more fun :-)
It is made by Northwoods Rubber Stamps, and is a deeply etched rubber stamp on a wood block. So easy to ink, so easy and beautiful to stamp with.

Yee Haw
Lovely new Waltzing Mouse Stamps - ooohhh, aggghhh, sigh ..... lol
They look so beautiful in the packaging, its so hard to open them and 'dirty' them, but 'dirty' them I must !
The stamps first outings was for a couple of friends Birthdays. HAPPY BIRTHDAY MARK and POLLY
 I searched high and low for a sheriffs badge die cut - Quick Kutz had one - thanks ebay :-)
Do you like the metallic, aged embossed look of the badge ? Stampendous aged copper embossing enamel - how gorgeous is that ! I also embossed around the edge of the central image.
The multi horse thing thats going on there is an idea I saw on the WMS website - I loved it so had to case it. It is so easy to do. I used the same colour ink each time. For the first horse on the left I inked up the horse stamp and stamped it on scrap paper twice, then onto my card front. The middle horse was inked up and stamped off once onto scrap. The final and darker horse was inked and stamped straight onto the card. Cool or what eh.
 My favourite things about this card is how well the background native blanket image stamped - LOVE that. The other thing I really like is the boots, stamped in Stampin' Up!s raspberry ripple and then UTEE'd. The little pearls just add a bit of interest and dimension.
They look so beautiful in the packaging, its so hard to open them and 'dirty' them, but 'dirty' them I must !
The stamps first outings was for a couple of friends Birthdays. HAPPY BIRTHDAY MARK and POLLY

Do you like the metallic, aged embossed look of the badge ? Stampendous aged copper embossing enamel - how gorgeous is that ! I also embossed around the edge of the central image.
The multi horse thing thats going on there is an idea I saw on the WMS website - I loved it so had to case it. It is so easy to do. I used the same colour ink each time. For the first horse on the left I inked up the horse stamp and stamped it on scrap paper twice, then onto my card front. The middle horse was inked up and stamped off once onto scrap. The final and darker horse was inked and stamped straight onto the card. Cool or what eh.

Sunday, November 4, 2012
September ATC's
The Septembers title was to produce something for a given decade, 1940's, 50's, 60's and 70's.

I was allocated the 70's, such a great musical decade - thank heavens for Saturday Night Fever and John Travolta :-) The front is a collage of 70's images, with a central rotating disco ball.


Subscribe to:
Posts (Atom)